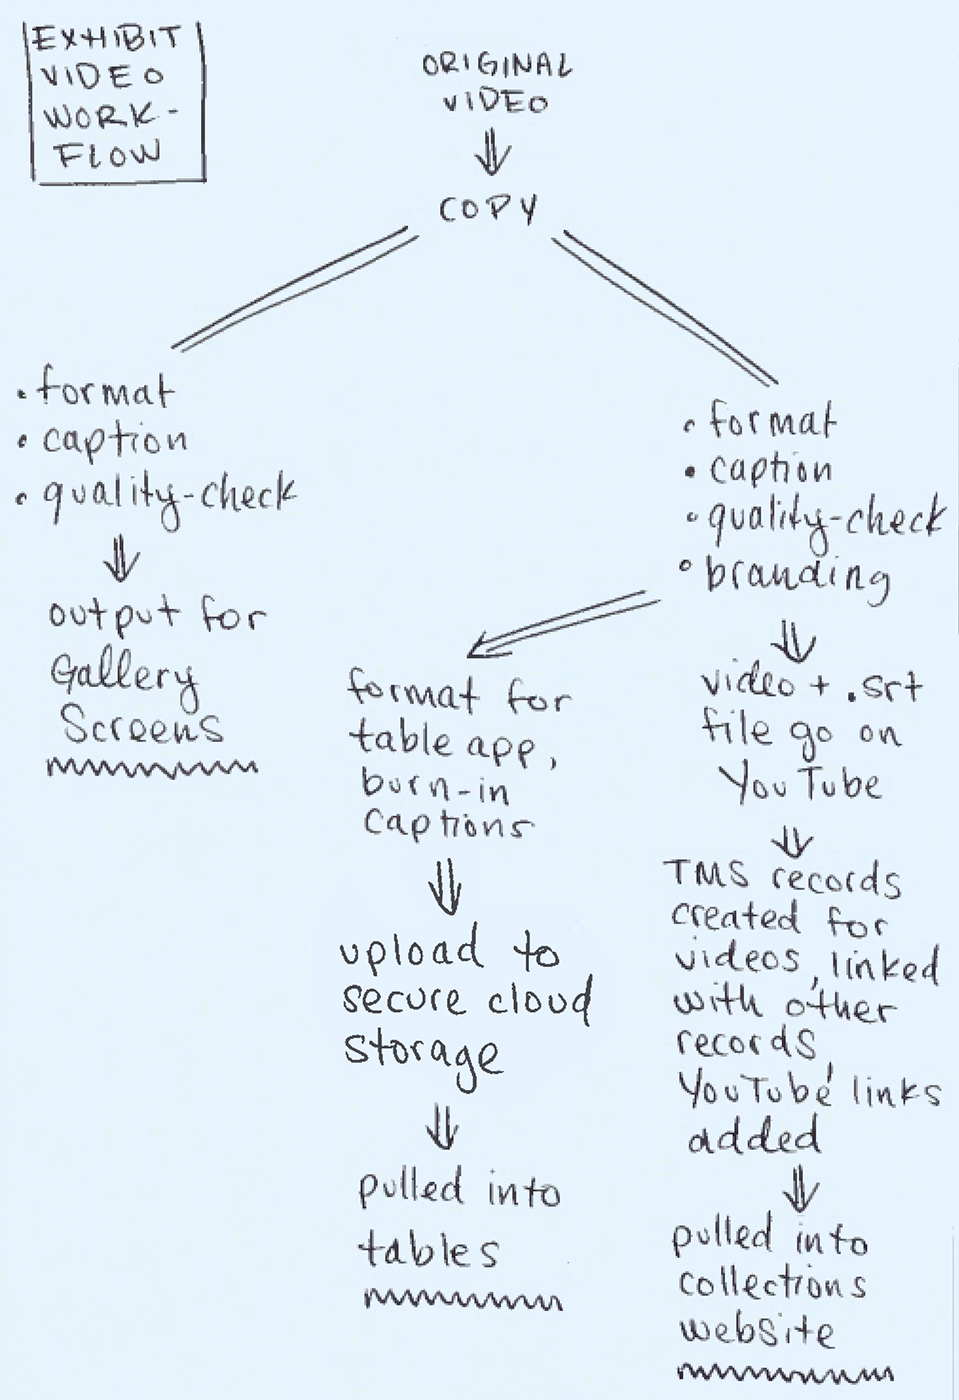
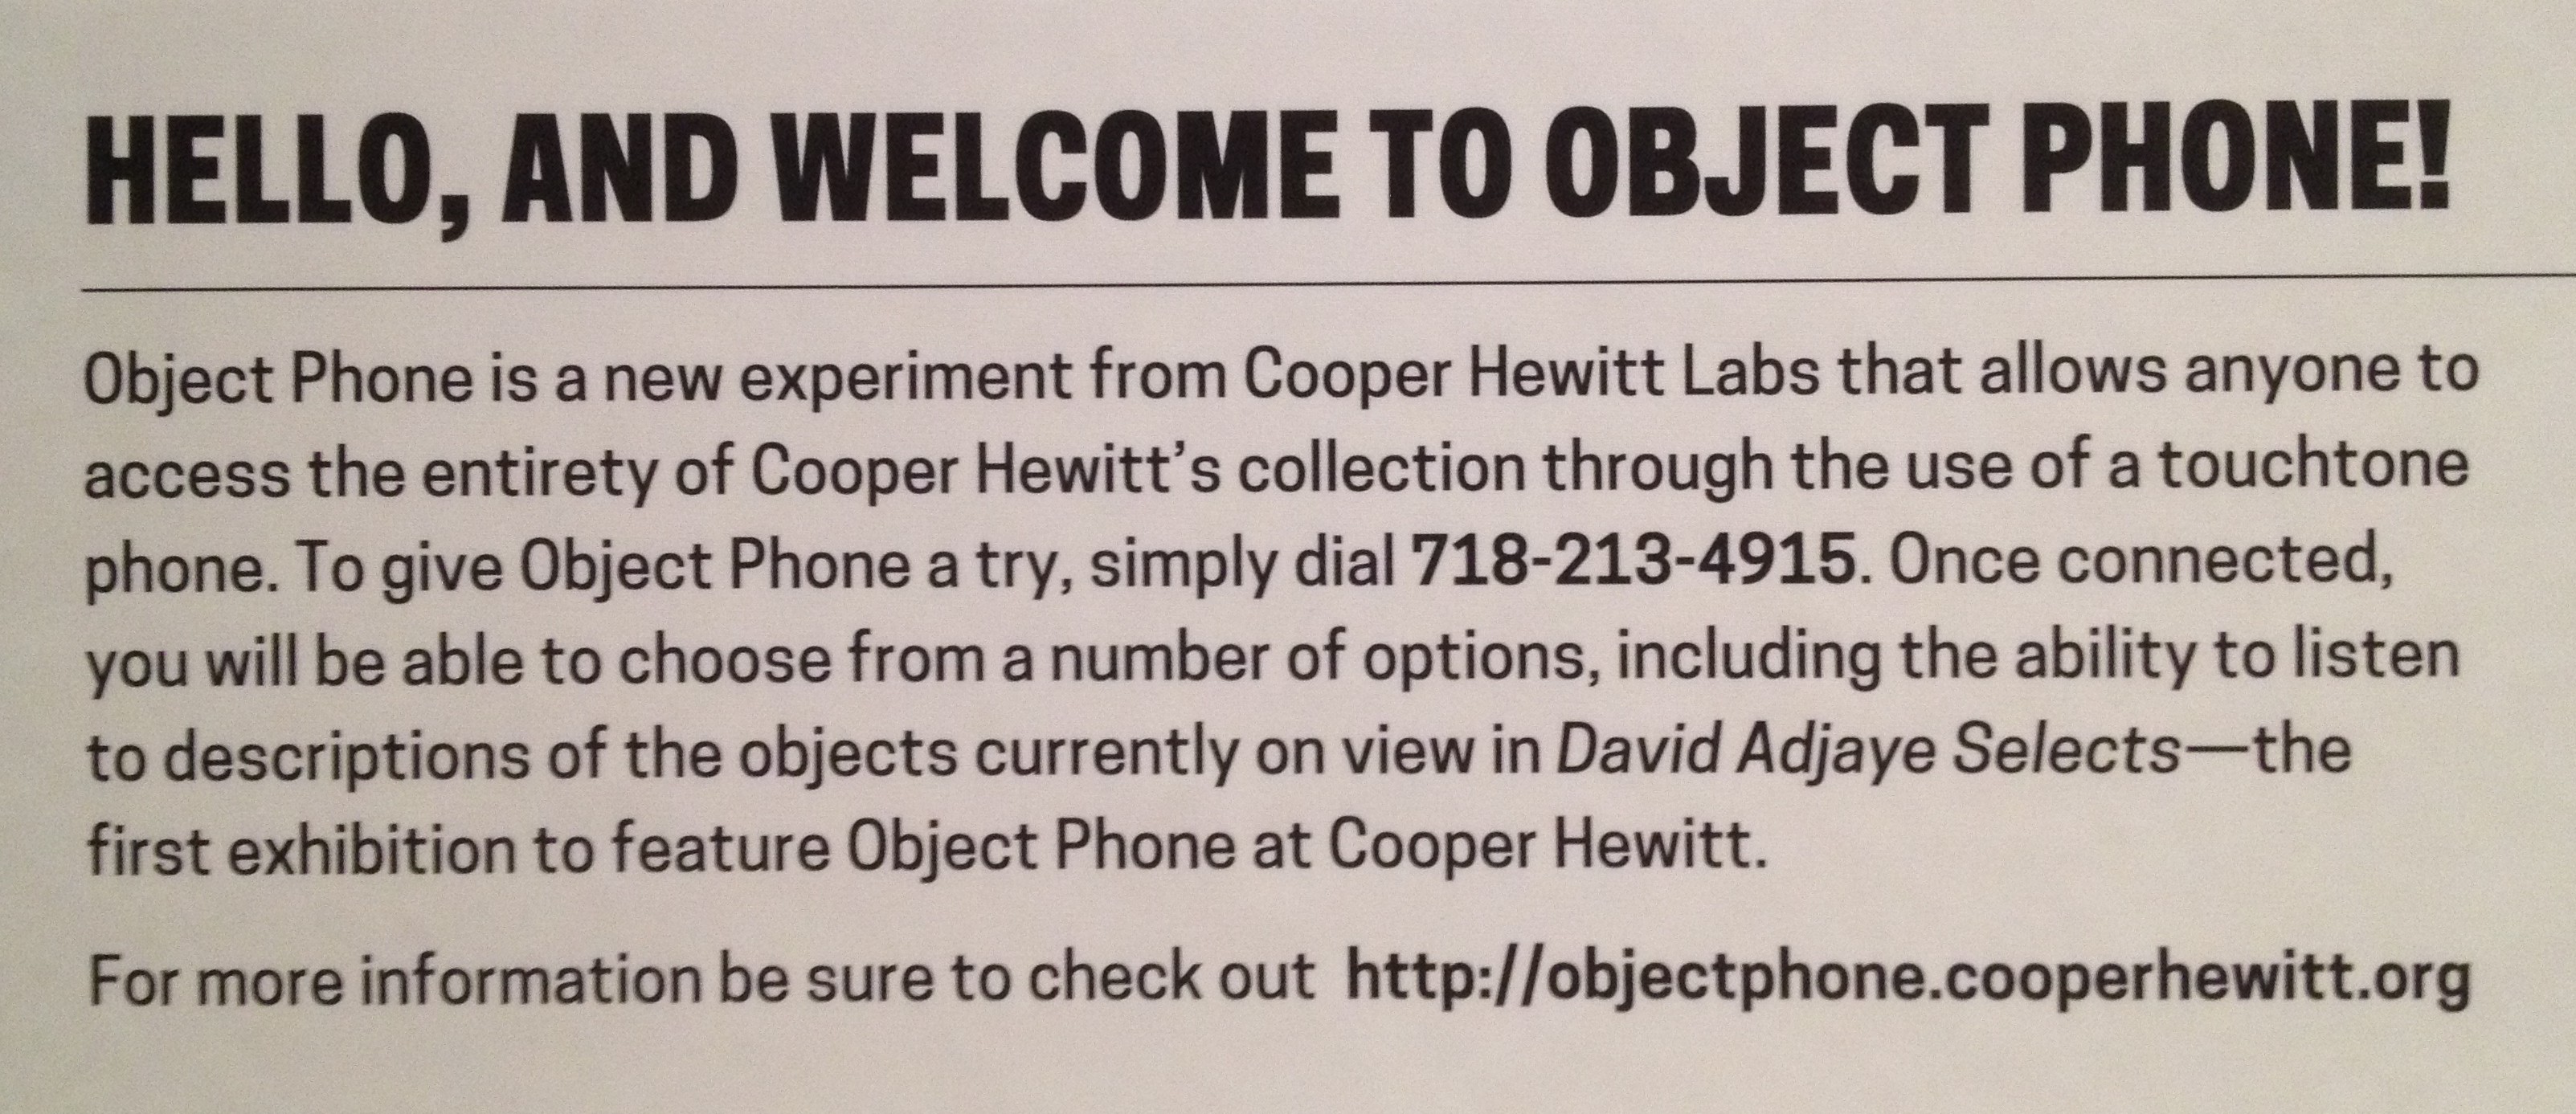
The final phase of a visitor’s experience at Cooper Hewitt, after they’ve left the museum, is what we call the “post-visit experience.” Introduced along with the Pen in March, it is a personalized website that displays a visitor’s interactions with the museum as a grid of images, including objects they collected from the galleries and wallpapers they created in the Immersion Room.
Our focus leading up to its launch was just to have it working, and as such, some of the details of a visitor’s experience with the application were overlooked. As a result of this, our theoretically simple interface became cluttered with extra buttons, calls to action and explanatory texts. In this post, I’ll present the experience as it existed before and describe some of the steps we took in the past month to iterate on the post-visit experience.
The “Before” Experience
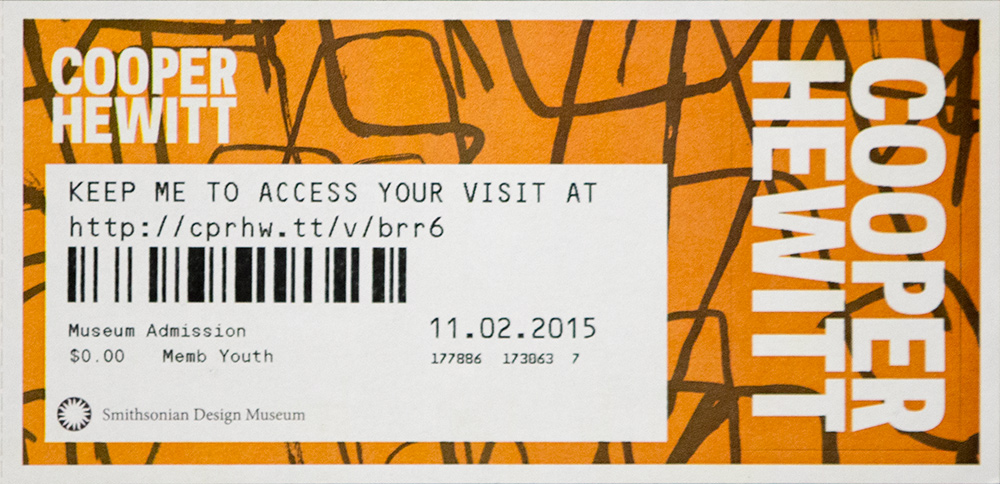
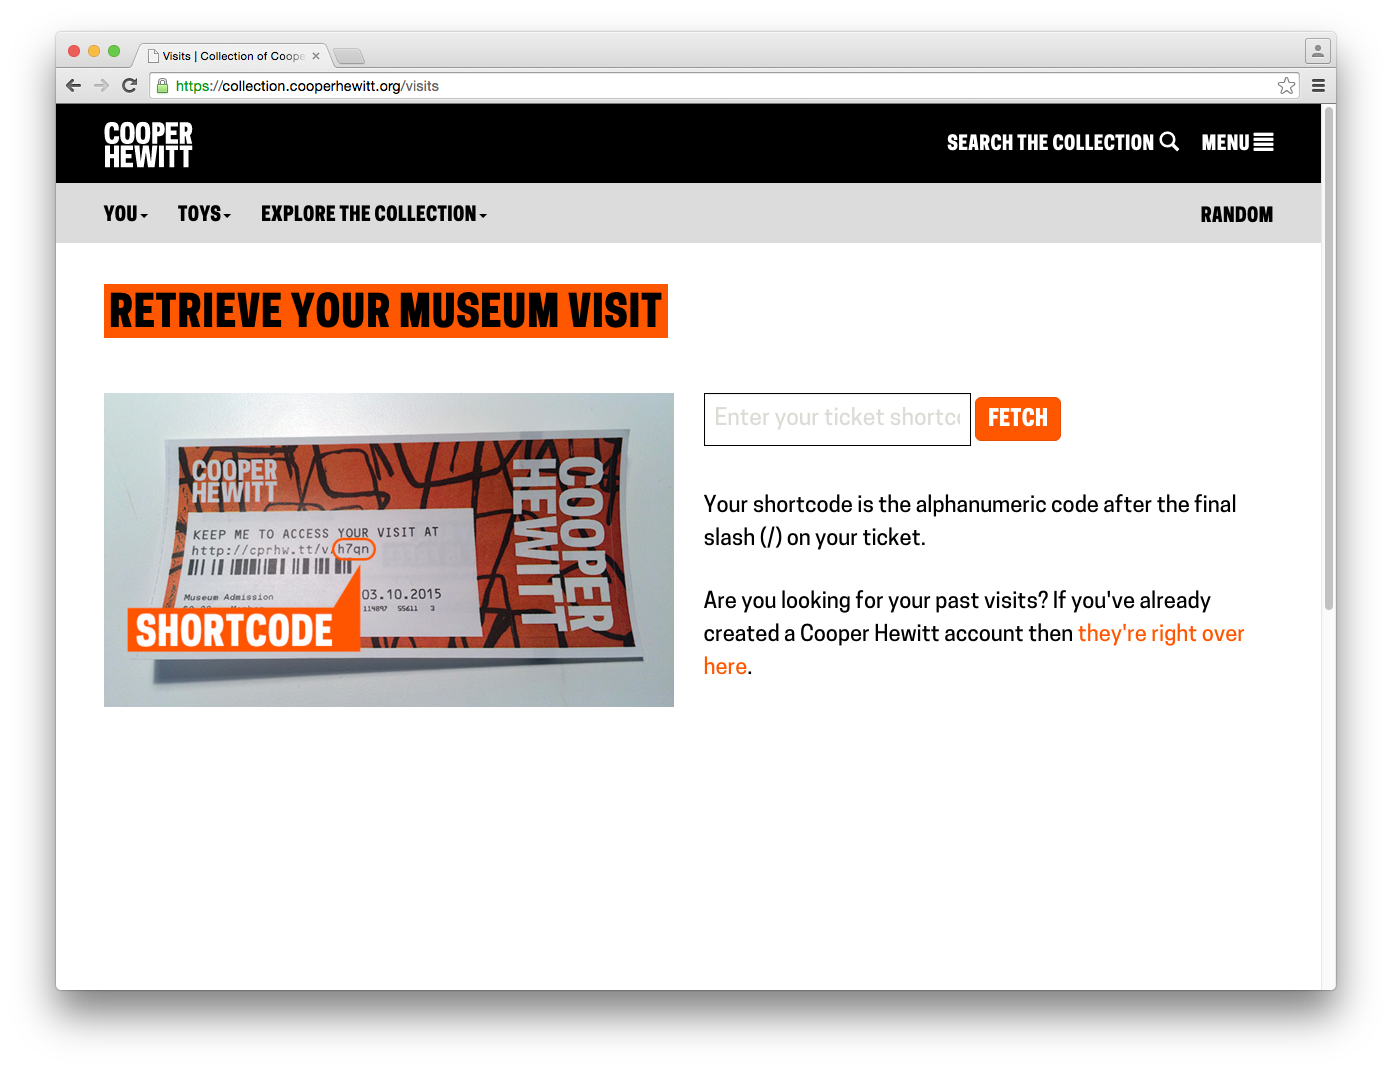
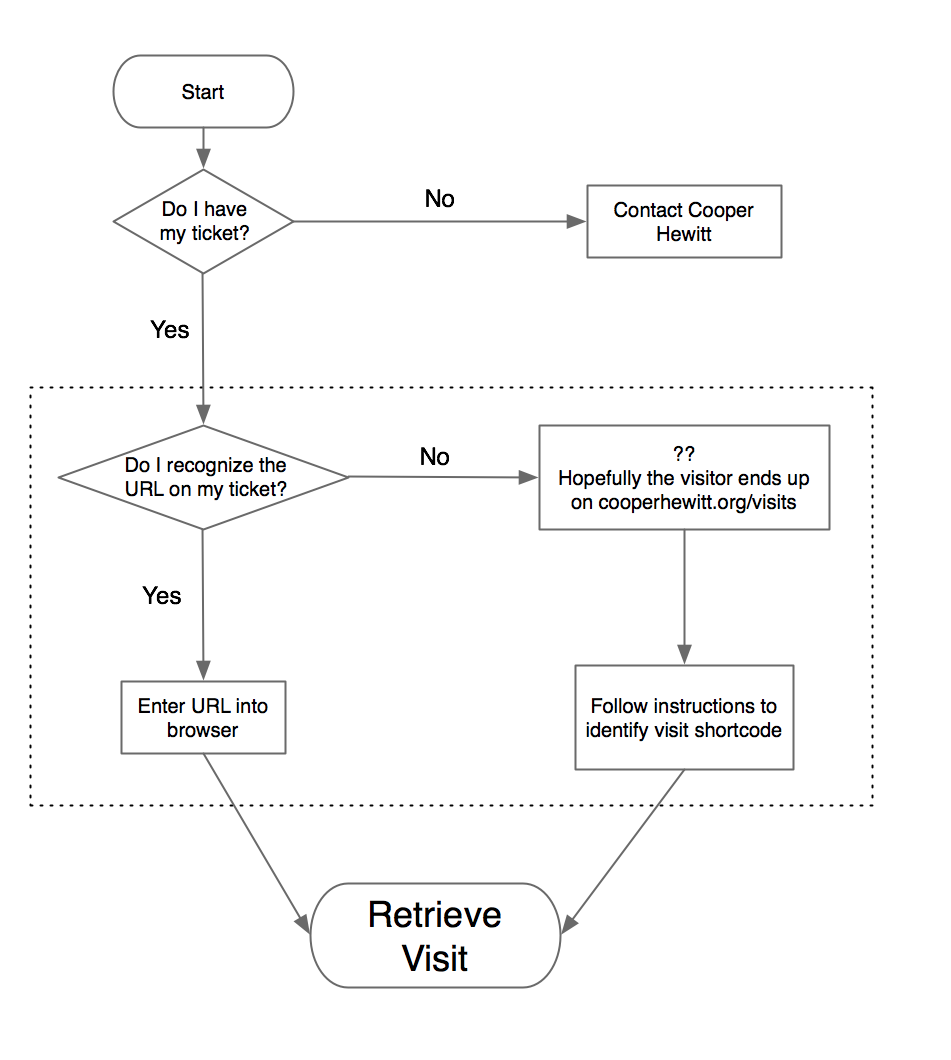
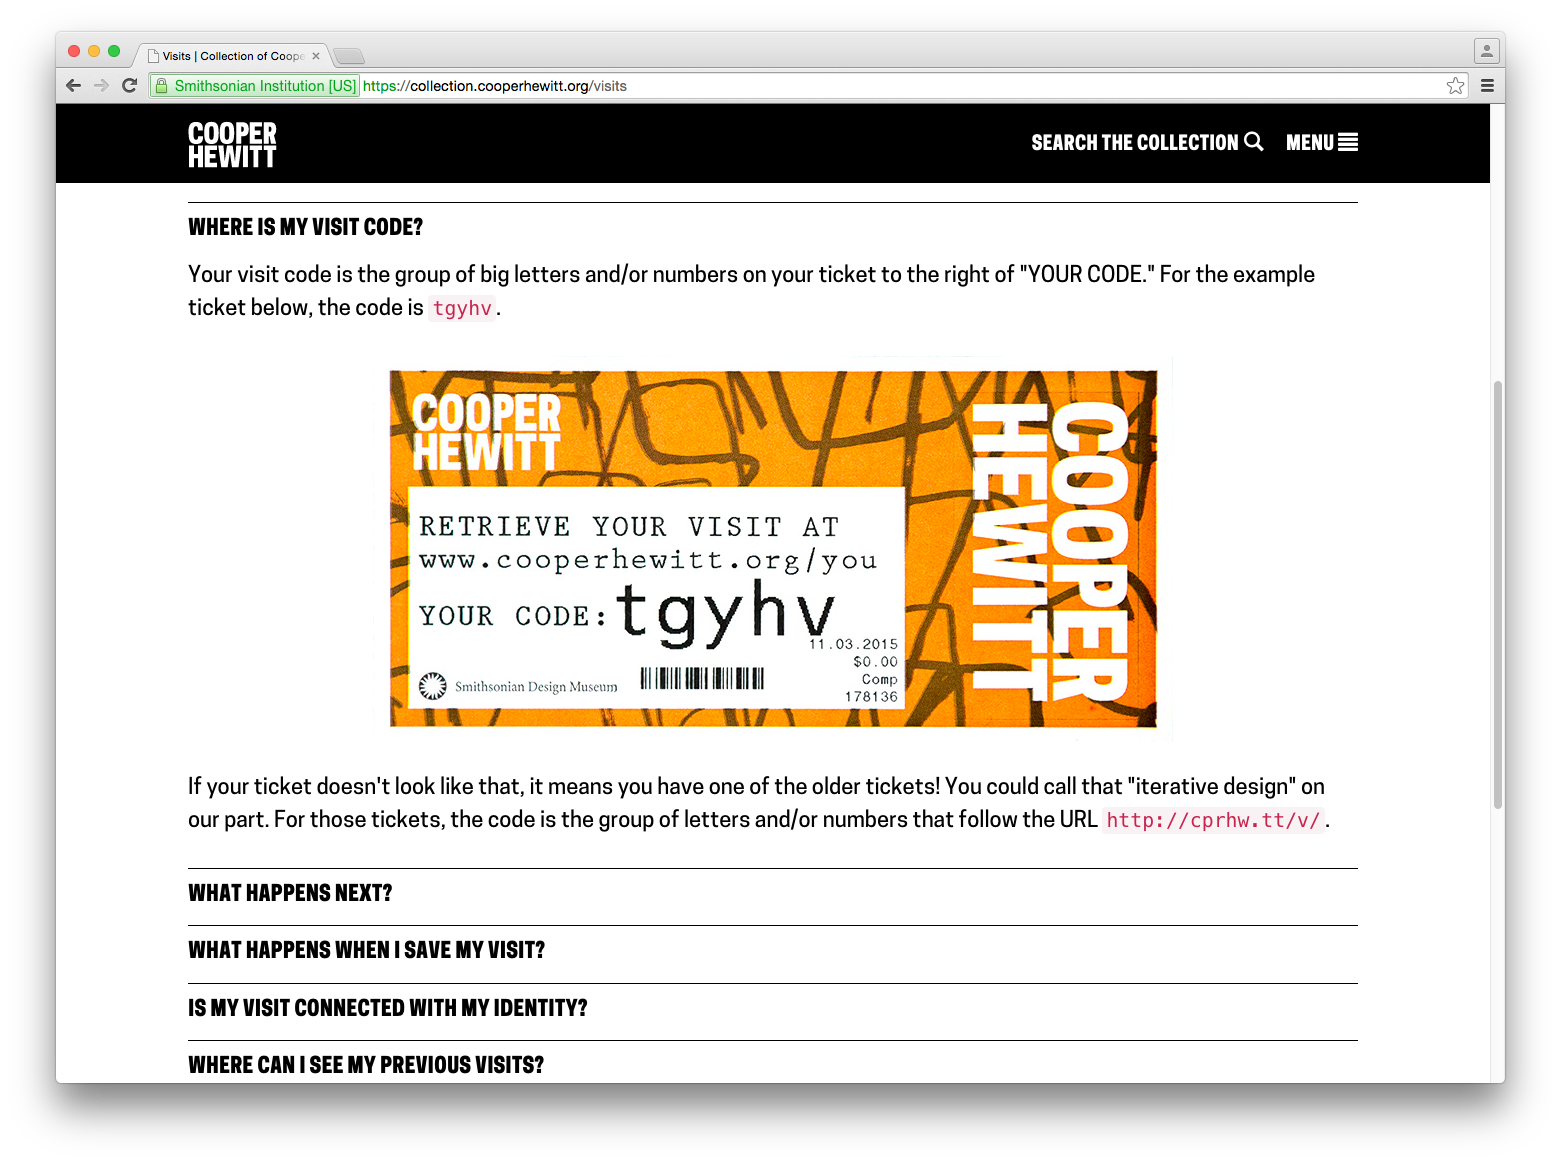
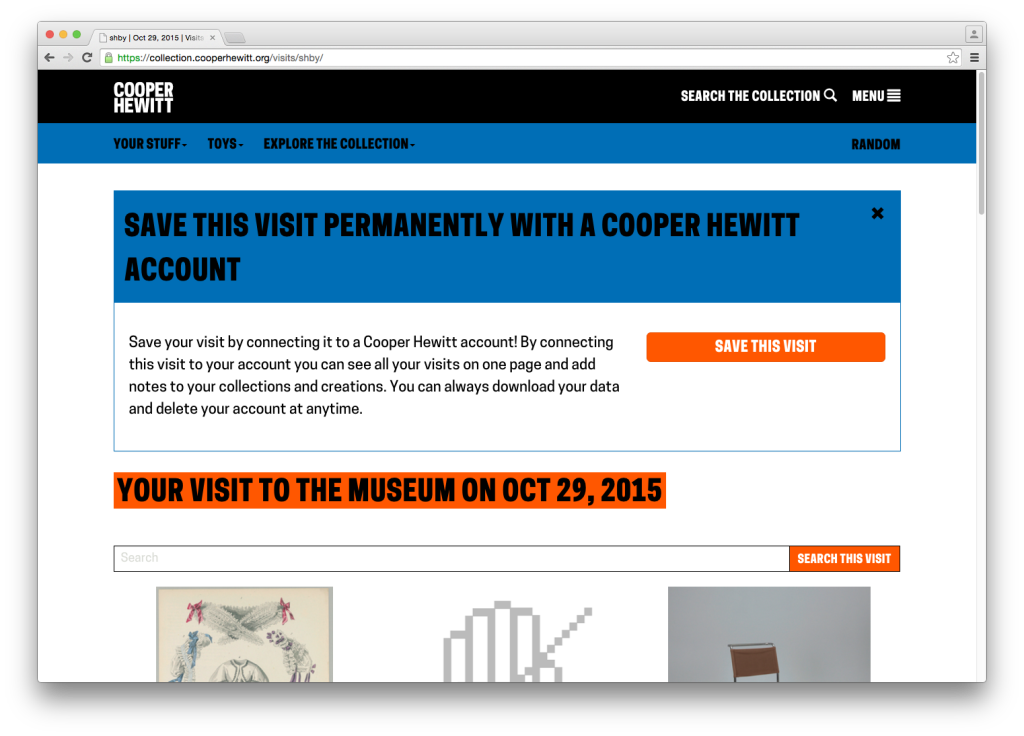
First, let’s walk through the experience as it existed up until this week. The post-visit begins when a visitor accesses their personal website, which they could do by going to a URL on their physical ticket. On the ticket above, that URL is https://cprhw.tt/v/brr6. The domain is our “URL shortener,” https://cprhw.tt, followed by /v/ to indicate a visit (the shortener also supports /o/ for objects or /p/ for people), followed by a four or five-character alphanumeric code which we call the “shortcode.” If a visitor recognized this whole thing as a URL, they would get access to their visit. If a visitor didn’t recognize this as a URL, they would hopefully go to our homepage and find the link that took them to the “visit shortcode page” seen below.

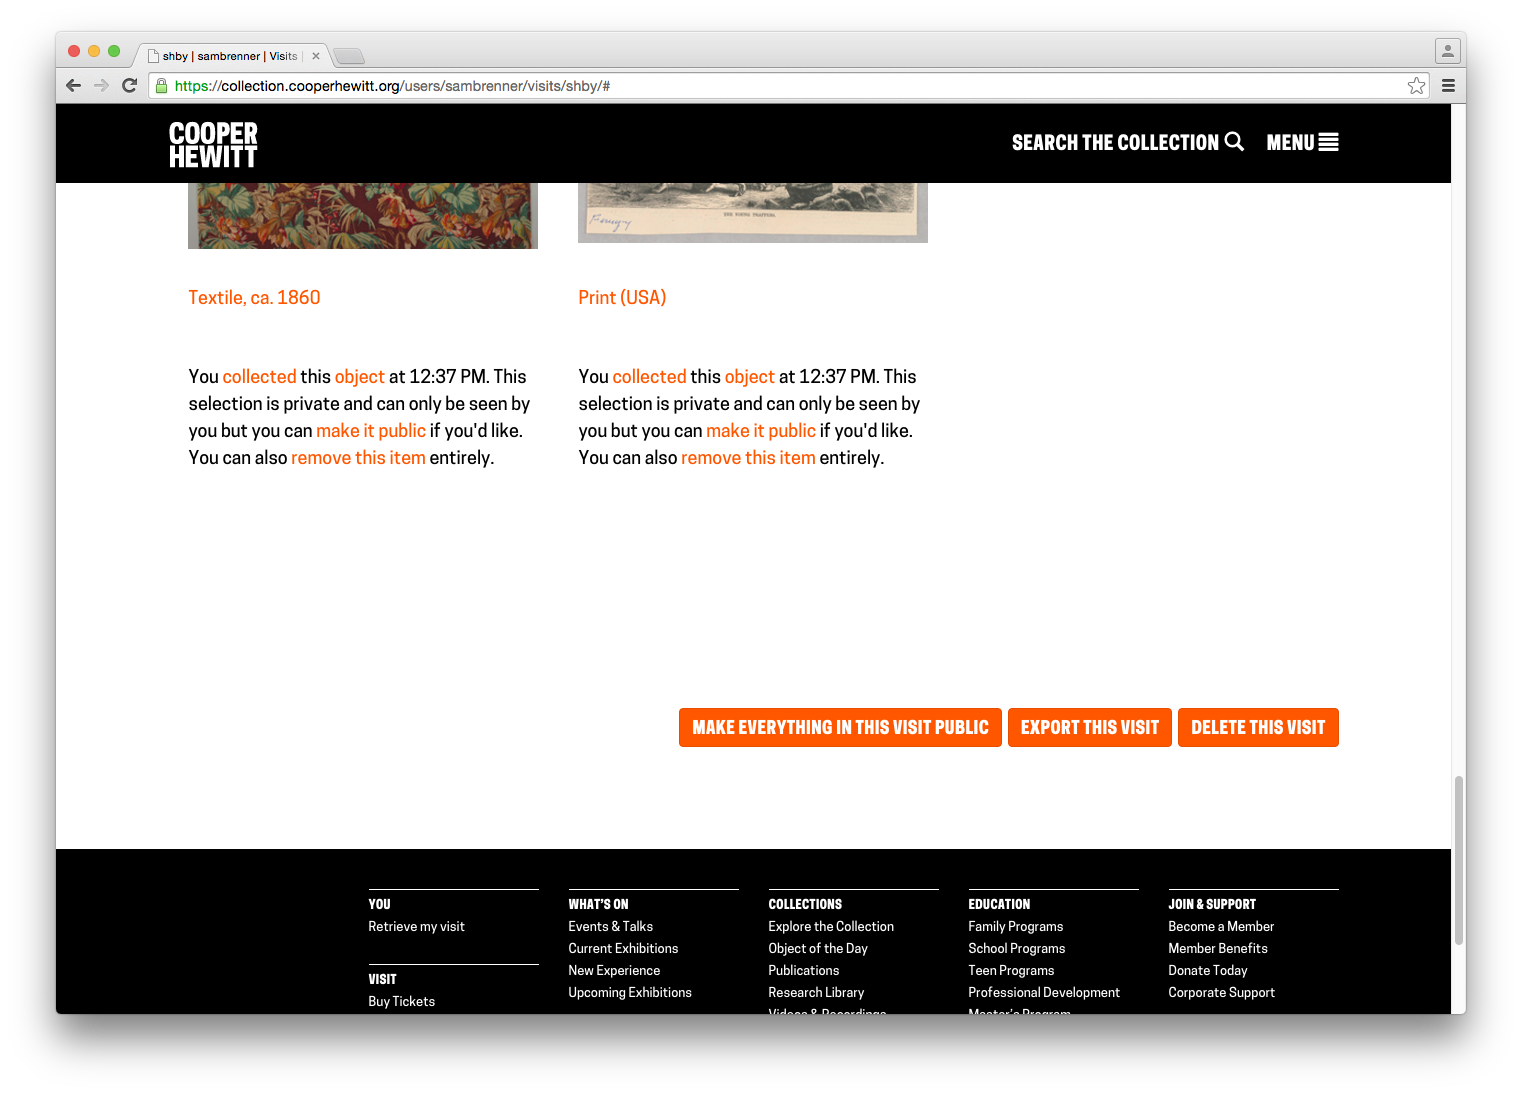
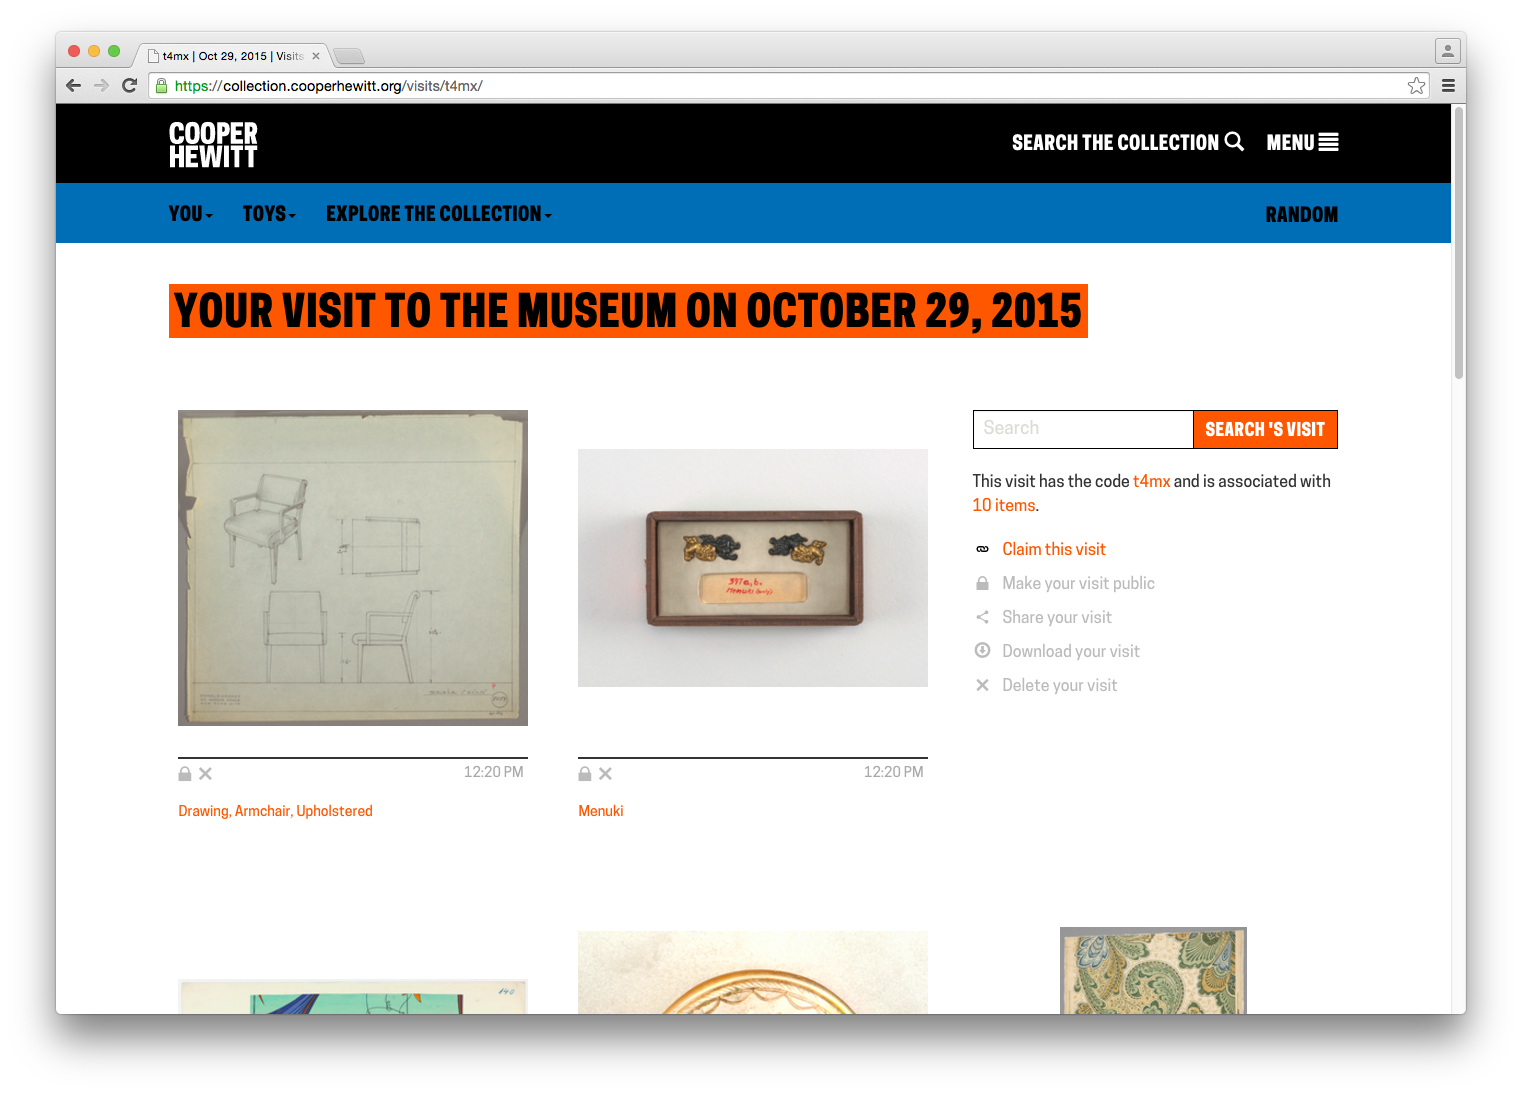
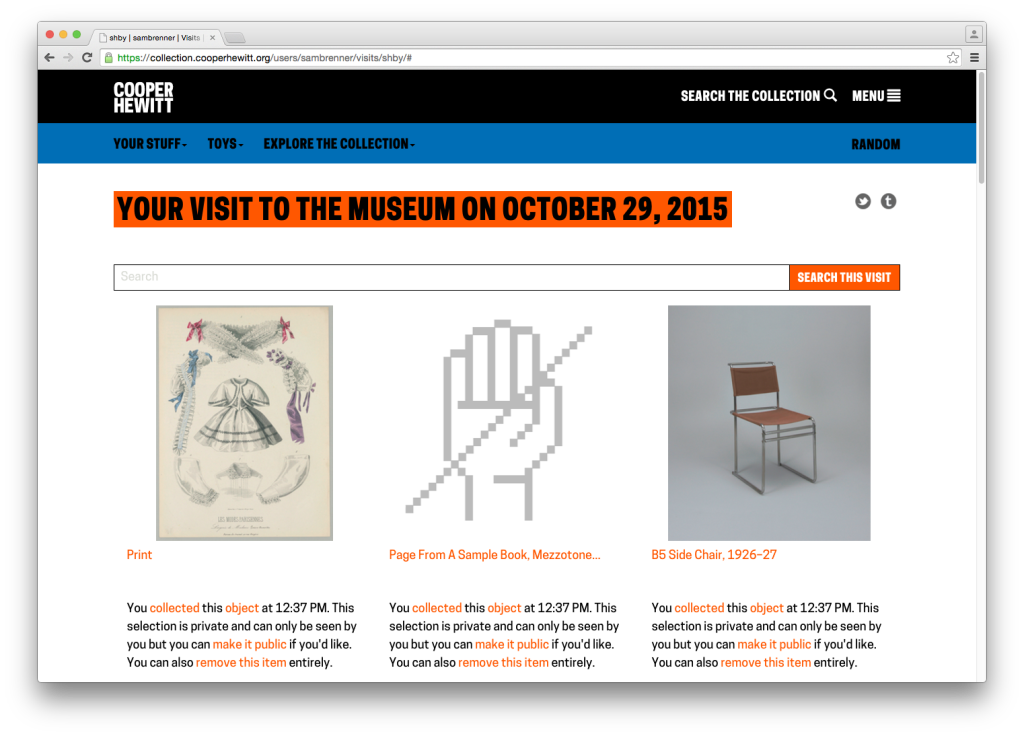
From here, they would enter their shortcode and get their visit. A visit page contains a grid of all the images of items you collected and created during your visit to the museum, which looked like this:
You will notice the unwieldy CTA. It’s big, it’s ugly and it gets in the way of what we’re all here to do, but this was our first opportunity to present the concept of “visit claiming” to the visitor. Visit claiming is the idea that your visit is initially anonymous, but you can create an account and claim it as your own. Let’s say the visitor engages the CTA and claims their account. They are taken through a log in / sign up flow and return to their visit page which has now been linked to their account.
After claiming a visit, the visitor has access to some new functionality. At the top of the page are the token share tools. Under every image now live privacy controls, in the form of a repeated paragraph. At the very bottom of the page are buttons to make everything public, export the visit and delete the visit.

What to Work On?
The goal for this work was to redesign the post-visit experience to put the visitor’s experience above all of our functional and technical requirements. At this point, we were all familiar with the many complex details along the way, so we met to discuss the end-to-end experience. Taking a step back and thinking in terms of expectations — both ours and the visitors’ — helped us rebuild the experience from the ground up. Feedback we had collected both anecdotally and through our online feedback form was helpful in this process. Once we had an idea of a visitor’s overall expectations of the post-visit experience, we were able to turn that into actionable tasks.
Step 1: Redesigning Visit Retrieval
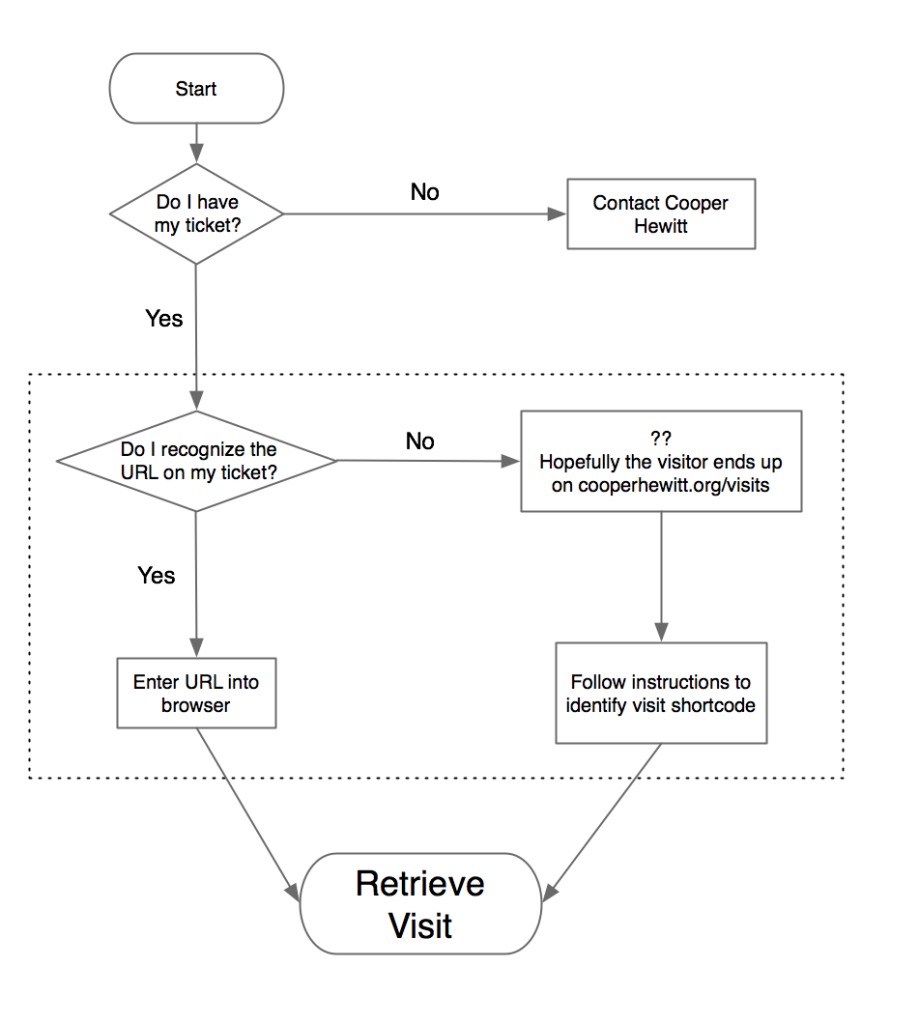
The first pain point we identified was the beginning of the experience: visit retrieval. Katie, our former Labs technologist, has written before about some of the ways we’ve tried to get visitors quickly up to speed on “how everything works” — the idea that you get a pen, you use the pen to collect objects, you go to a website and you get your objects. Her work focused on informational postcards and the introductory script used by the visitor experience staff. In the case of the visit retrieval flow chart above, this helped reduce the number of “no” answers to the two questions: “do I have my ticket?” and “do I recognize the URL on my ticket?”
That second question — “do I recognize the URL on my ticket?” — is not a question we would have expected visitors to even be asking. To us, the no-vowel/non-standard-TLD “URL-shortener”-style URL, a la bit.ly or t.co, has an instantly recognizable purpose. Through visitor feedback, we learned that for some visitors, it understandably looked more like an internal tracking number than the actual website we wanted people to go visit.
For these visitors, the best-case scenario is that the they would go to our main website where we provide links, both in the header and on the homepage, to the “visit retrieval” page. Here it is again, for reference:
Since we expected users to go straight to the URL on their ticket, this page was more of a backup and as such hadn’t received a lot of attention. As a consequence of this, there were a few things that confused users on the page. First, the confirm button’s CTA is “fetch,” which is different from the “retrieve” used in the header and “access” used on the ticket. Second, the placeholder text in the input field is cut off. Third, the introduction of the word “shortcode,” which we’ve always used internally to refer to a visitor’s visit ID, had no meaning in the visitor’s mind. We tried explain it by saying that it means “the alphanumeric code after the final slash on your ticket,” which is a useless jumble of words.
Our approach to this was to eliminate the “do I recognize the URL?” question and its resulting outcomes (the dotted box in the flow chart above) and replace it with self-evident instructions. To that end, we redesigned both the visit retrieval page and the ticket itself. Here’s the new ticket:
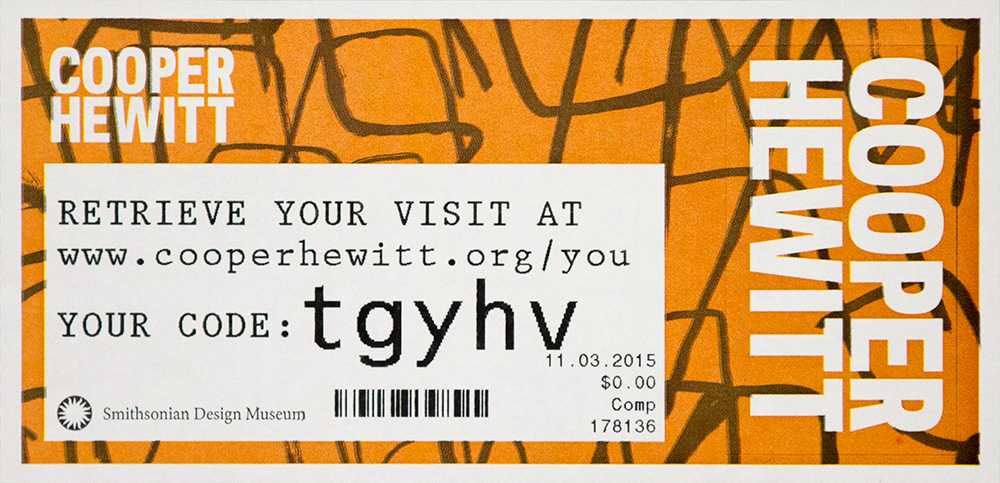
We’ve provided a much more human-friendly URL in “www.cooperhewitt.org/you” and established the shortcode (now just called “code”) as a separate entity. Regardless of whether or not visitors were confused by the short URL, the language on the new ticket fits with our desire to use natural language wherever we can to avoid having the digital experience feel unnecessarily technical.
The visit retrieval page (which is accessed via the URL on the ticket) also got an update. The code entry field got much bigger and we tucked a small FAQ below it. We also standardized on the word “retrieve” as the imperative.


Step 2: Redesigning the Visit Page
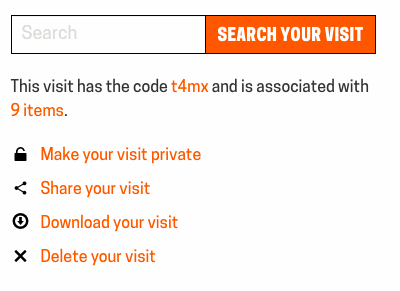
The next pain point we identified was the visit page itself, and specifically how we used it to explain claiming and privacy. Here’s the page again for reference:
The problem concerning how we explained claiming is fairly straightforward. The visual design of the CTA is obtrusive, but it was our only opportunity to explain the benefits of claiming a visit. We sought to find a less obtrusive, more intuitive way to explain why claiming a visit is an option our visitors might want to take advantage of.
The problem concerning how we explained privacy is the more complicated of the two issues. It specifically regards the concept of the “anonymous visit.” Visits aren’t connected with visitor’s identities in any way except in that only they know the code. We do this because we need a way to uniquely identify each museum visit and the shortcode keeps that unique ID at a reasonable length. We also want to allow visitors to have an anonymous post-visit experience, meaning they can see everything they did in the museum without having to sign up for an account. But we don’t expect everyone to remember their shortcode or hold on to their ticket forever, so we allow visitors to create an account on our website and “claim” their visits. A claimed visit is linked to a visitor’s email address, so now they can throw out their ticket and forget their shortcode. Over time, we also hope that visitors will claim multiple visits with their accounts so they get a complete history of their relationship with our museum.
The problem this presents is that we have to treat every visitor who has a code as if they are the owner of that visit. This manifests itself in a specific (but important) use case. If a visitor shares their visit on social media while it is unclaimed, then any person who accesses the visit will also have the option to sign up and claim it as their own.
Further compounding this issue is the fact that we automatically make claimed visits private. We do this because in claiming an account, the visitor is effectively de-anonymizing it. Claimed visits are linked to real-world identities (in the form of a username) and for that reason we make it an opt-in choice to go public with that connection.
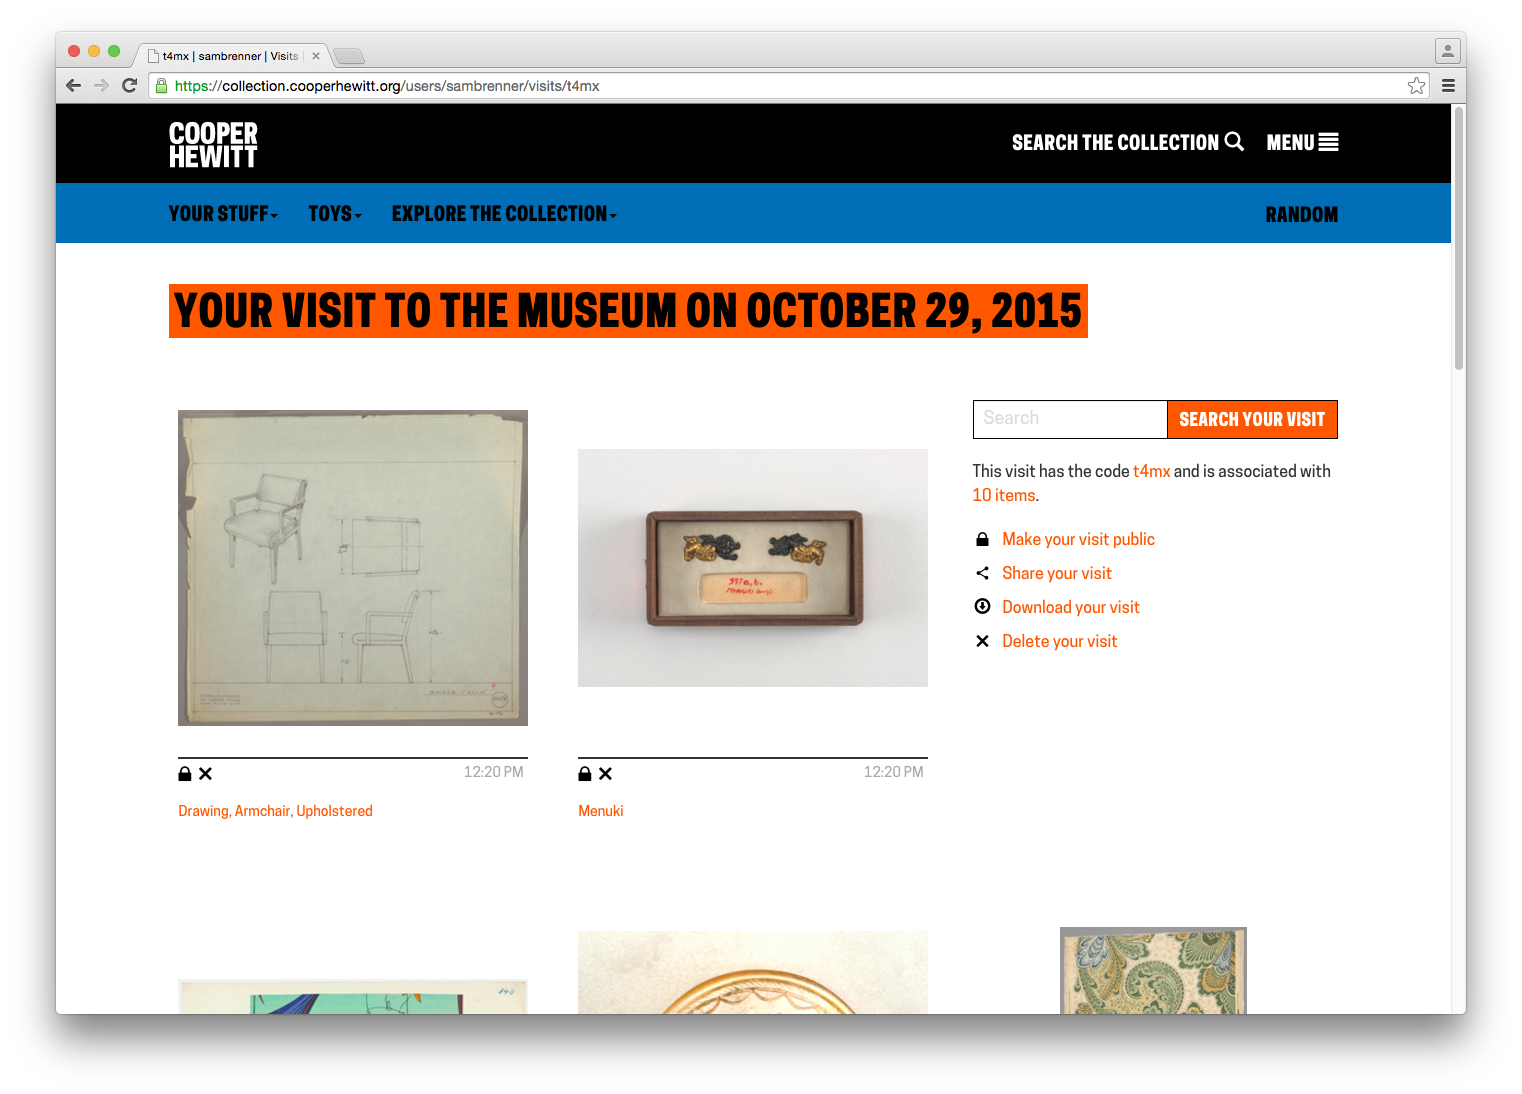
The goal of redesigning this page, then, was to allow the visitor to navigate the complex business logic without having to fully comprehend it. In talking this through we concluded that by consolidating the visit controls (which previously only appeared on the claimed visit page) and adding them (greyed out) to the unclaimed visit we could solve many of our problems. Why have a paragraph of explanatory text about why you should claim your visit when we could just show you the control panel that claimed visits have access to? A control panel presents the functionality plainly and concisely, without confusing language.
This also allowed us to establish a language of icons that we could reuse elsewhere to replace explanatory sentences. We also agreed to standardize on the word “claim” as the action that we wanted visitors to engage in, as it more effectively conveys the idea that other people have visits as well but we need to know that this one was yours.
Best of all, it allowed us to build off the work we’d done earlier this year which had the explicit purpose of organizing our code and visual hierarchy to better support future iterations.
Here’s what that ended up looking like.

Interacting with any of the controls invokes a modal dialog that prompts the user claim their visit. If they’re not logged in, they are presented with a login / signup prompt. Otherwise they are asked to confirm their desire to claim the visit. Once claimed, the controls function as expected. Like the changes we made to the ticket design, it moves towards a more self-evident experience that requires less information processing time on the visitor’s part.

Finally, some bonus gifs to show off the interaction details. The control panel has some rollover action:
We use modal dialogs to confirm privacy changing, deleting and claiming actions:

A Brief Bit About Code
Powering the redesign was a complete overhaul of the Javascript that powers these pages. Specifically, we reorganized it to remove inline code and decouple API logic from DOM logic. In lay terms, this means separating the code that says “when I click this thing…” from the code that says “…perform this action.” When those separate intentions are tightly coupled, the website is less flexible and doing maintenance work or experimenting with alternate user flows requires more effort than necessary. When separate, it makes reusing code much more straightforward, which will allow us to tweak and test with ease going forward. Recent frameworks such as Angular or React, which we’ve only just started experimenting with, excel at this. For now, we opted for a slightly modified module pattern, which gives us just enough structure to keep things organized without having to learn a new framework.
What’s Next?
The changes have only been live for a few days now so it will take some time to build up enough numbers to see where to focus our future improvements on this part of the site. Specifically, we will be looking at the percentage of visitors who visit their website and the percentage of those visitors who create accounts, and hope to see the rate of change increasing for both of those numbers.
One part of this visitor flow where we hope to do structured A/B tests is with the “sign up” functionality. Right now, when a visitor enters their code and clicks the “Retrieve” button, they are taken immediately to their visit page. We want to test whether adding in a guided “visit claiming” flow, which would optionally hold the user’s hand through the account creation process before they’ve seen their objects, results in more account creations. We’ll wait and collect enough “A” data before rolling the “B” test out.
Of course, there are big questions we can start answering as well. How can we enhance the value of a visitor’s personal collection? Right now we have rudimentary note-taking functionality which is severely underutilized. What do we do with that? What about new features? We have all of our object metadata sitting right there waiting to be turned into personalized visualizations. (Speaking of that – we have public API methods for visit data!) Finally, how can we complete the cycle and turn the current “post-visit” into the next “pre-visit” experience?
With each iteration, we strive not only to apply what we’ve learned from visitors, colleagues and peers to our digital ecosystem, but also to improve the ease with which future iterations can be made. We are better able to answer questions both big and small with these iterations, which we hope over time will result in a stronger and more meaningful relationship between Cooper Hewitt and our visitors.