Monthly Archives: December 2013

Rijkscolors! (or colorific promiscuity)


rijkscolours-yellow

(Rijkscolors are currently disabled as we consider longer-term solutions for cross-institutional browsing and searching. It’ll be back soon!)

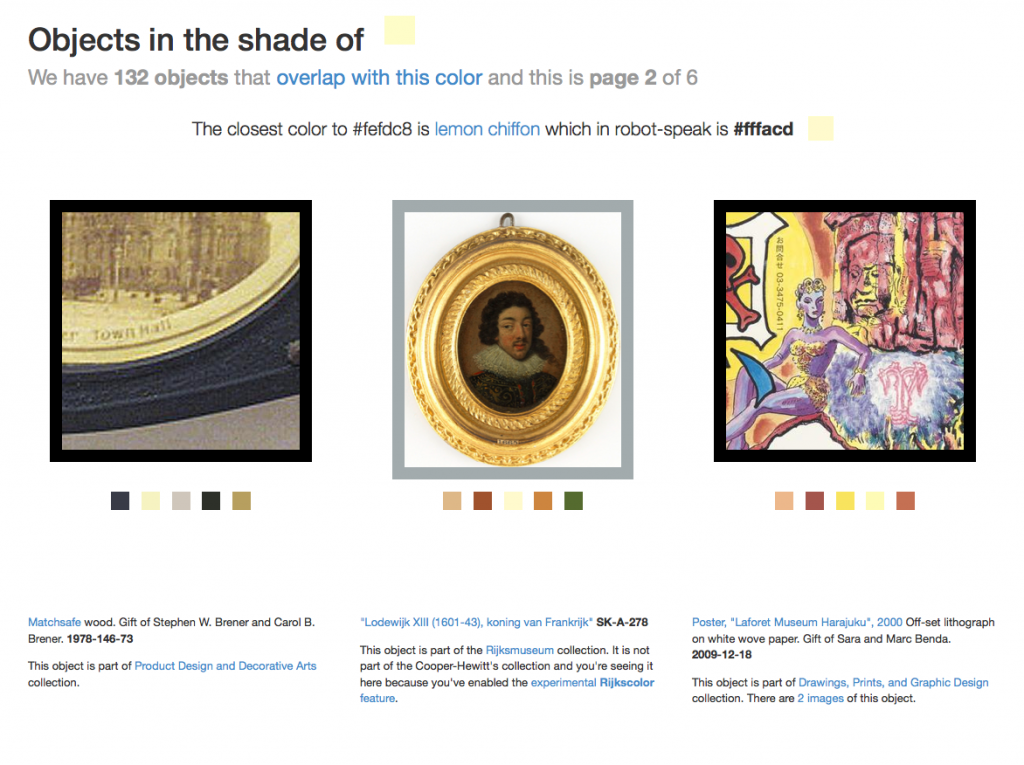
Rijkscolors are an experimental feature that allow you to browse not only images from the Cooper-Hewitt’s collection but also images from the Rijksmuseum by color!

We see this as one way to start to work through the age-old problem of browsing collections across multiple institutions. Not everyone arrives at the Cooper-Hewitt (or the Rijksmuseum) with an expert knowledge of our curatorial and collecting history and the sheer volume of “stuff” available can be overwhelming. Everyone, at some point, has the “Explore” problem: It’s the point where you have so much good stuff to share with people but no good (or many sort-of-bad) avenues for letting people know about it.

Color is an intuitive, comfortable and friendly way to let people warm up to the breadth and depth of our collections. Since adding the ability to search the collection by color it’s quickly become the primary way that people browse our collection (more on that below) and as such feels like an excellent tool for browsing across collections.

rijkscolours-4

Over time, we hope to add this functionality for many other cultural heritage institutions but chose to start with the Rijksmuseum because we share an historical focus in our early collecting practices and because they were nice (read: AWESOME) enough to make all their collection images available under a liberal Creative Commons license.

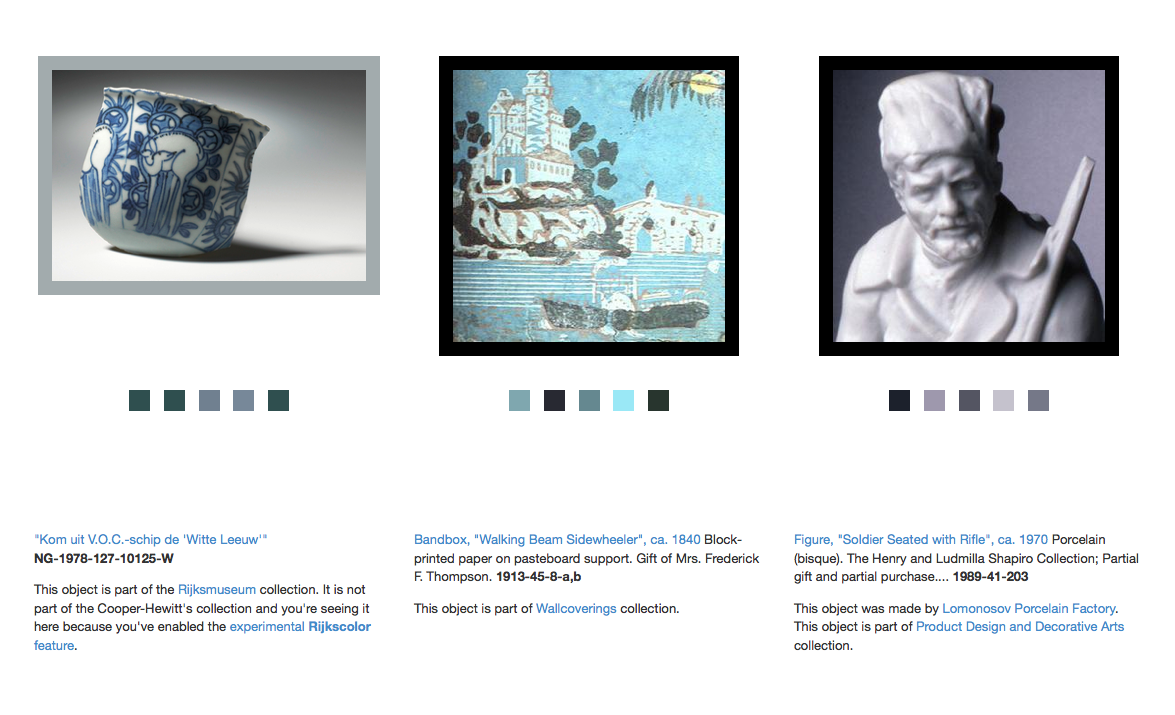
We then indexed all those images using the same tools we use to extract colors and measure busy-ness or “entropy” from our own collection and combined the two lists. Images from the Rijksmuseum have a different colored border to indicate that they are not part of our collection. Images from the Rijksmuseum link directly to the page for that object on the Rijksmuseum website itself.

rijkscolours-bunny-crop

As with the concordances for people we just want to hold hands (for now — Seb tells me this means we might want to move to second base in the future) with other museums and are happy to send visitors their way. After all, that’s what the Internet is for!

Rijkscolors is an experimental feature so you’ll need to enable it on a per-browser basis by visiting the experimental features section of the collection website, here:

https://collection.cooperhewitt.org/experimental/#rijkscolors

But wait, there’s more.

We’ve also made public all the code used to harvest metadata and images from the Rijksmuseum as well as the resultant data dumps mapping colors and entropy scores to Rijksmuseum accession numbers with internal Cooper-Hewitt object IDs. We created a custom mapping because we use Solr to do color search on the website and that requires a numeric ID as the primary key for an object.

Then we imported all the objects from the Rijksmuseum, along with their color values and other metrics, in to our Solr index giving them a magic department ID (aka 51949951 or the Rijksmuseum) and making them private by default. If you’ve enabled Riskscolors when we search for objects by color instead of only asking for things with a given color that are public we ask for things that are public OR part of department number 51949951. Simple!

The code and the data dumps are provided as-is, more of a reference implementation and a toolbox than anything you might use without modifications. We’ve put it all on GitHub and we welcome your suggestions and fixes:

https://github.com/cooperhewitt/rijksmuseum-collection/


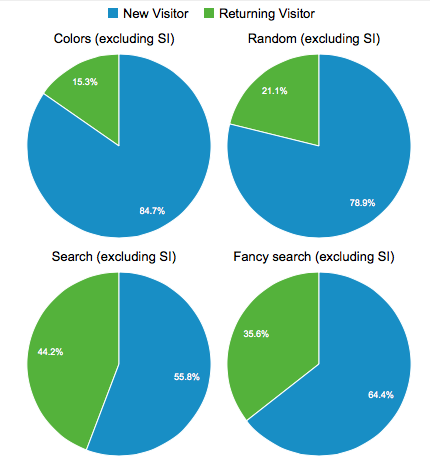
We mentioned search vs browse so let’s take a peek at the last 30 days (Nov 11 to Dec 10, 2013) of visitor behaviour on the collection site.

last30 days nov-dec-2013 new vs returning

Or put another way:

  • 48.89% of visits used color navigation (anywhere – not just color palette page)
  • 4.39% of visits used normal search
  • 2.24% of visits used random button
  • 1.25% of visits used fancy search

The figures for color navigation are artificially inflated by the press the feature got in Slate, The Verge and elsewhere (the comments are amusing), but even removing that spike, color navigation is at least twice as used as search in the time period. We’ll report back on some new data once December and January are done.

last30 days nov-dec-2013 tos & ppv

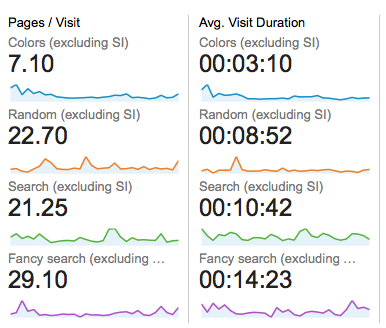
Not unsurprisingly, visitors who use search spend a lot more time on the site and look at many more pages. They are also far more likely to be returning visitors. For newbies, though, color and random navigation methods are far more popular – and still result in healthy browsing depths.


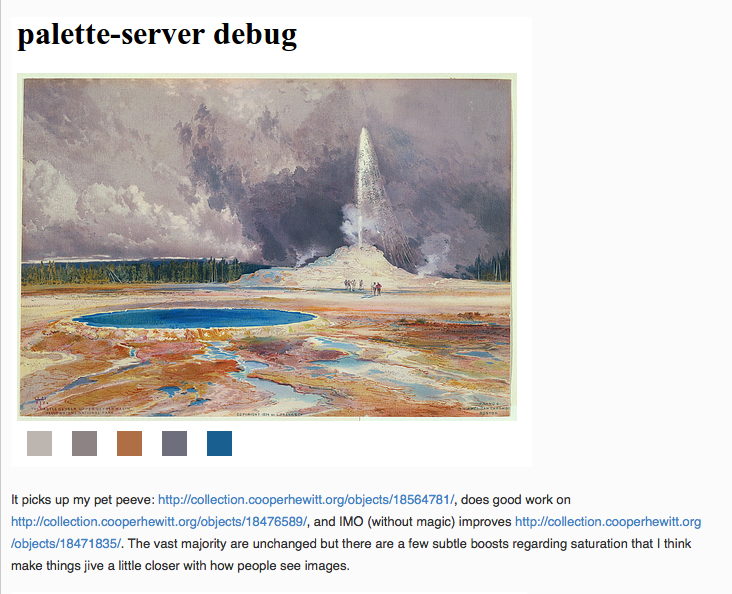
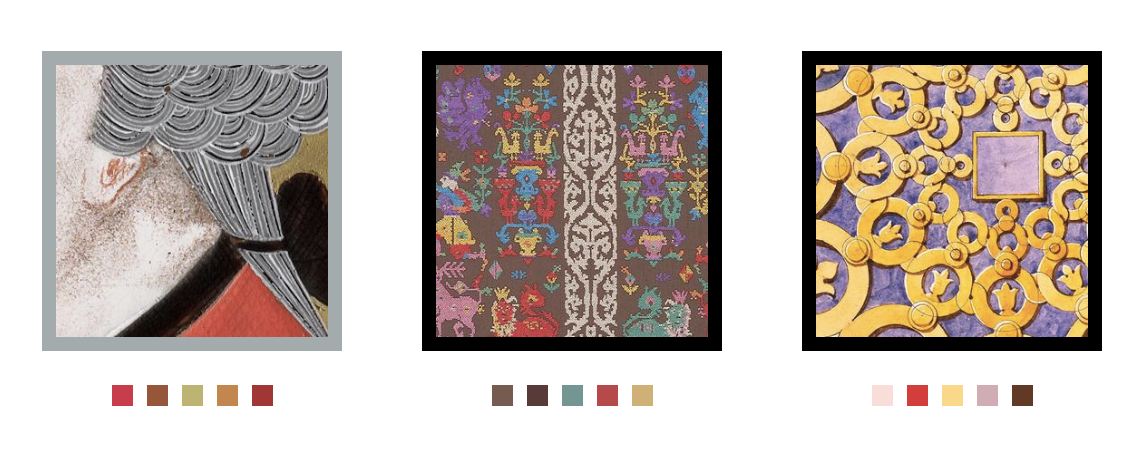
In related news Nate Solas sent us a patch for the palette-server, the tool we use to extract colors from our collection imagery. He said:

“…this improves the color detection by making it a bit more human. It goes two ways: 1) boost all color “areas” by saturation, as if saturated colors take up more room in the image. 2) add a “magic” color if a few conditions are met: not already included, more than 2x the average image saturation, and above the minimum area for inclusion.”

palette-server-nate

We’ve now merged Nate’s changes in to our code base (technically it’s actually a change to Giv’s RoyGBiv code) and they will be applied the next time we run the color-extraction tools on our collection (and the Rijksmuseum’s collection). Thanks, Nate!

As with all the experimental features they are … well, experimental. They are a little rough around the edges and we may not have found (or even noticed) any outstanding problems or bugs. We hope that you’ll let us know if you find any and otherwise enjoy following along as we figure out where we’re going, even if we’re not always sure how we get there.

Screen Shot 2013-12-11 at 12.23.23 PM

"C" is for Chromecast: hacking digital signage

chromecast-fire-w2

Since the late 1990s museums have been fighting a pointless war against the consumerization of technology. By the time the Playstation 2 was released in 2000, every science museum’s exhibition kiosk game looked, felt, and was, terribly out dated. The visitors had better hardware in their lounge rooms than museums could ever hope to have. And ever since the first iPhone hit the shelves in 2007, visitors to museums have also carried far better computing hardware in their pockets.

But what if that consumer hardware, ever dropping in price, could be adapted and quickly integrated into the museum itself?

With this in mind the Labs team took a look at the $35 Google Chromecast – a wifi-enabled, HDMI-connected networked media streaming playback system about the size of a USB key.

With new media-rich galleries being built at the museum and power and network ports in a historic building at a premium, We asked ourselves “could a Chromecast be used to deliver the functionality of digital signage system, but at the fraction of the cost”? Could some code be written to serve our needs and possibly those of thousands of small museums around the world as well?

chromecast-dongle-pen

Before we begin, let’s get some terms of reference and vocabulary out of the way. The first four are pretty straightforward:

Display – A TV or a monitor with an HDMI port.

Chromecast device – Sometimes called the “dongle”. The plastic thing that comes in a box and which you plug in to your monitor or display.

Chromecast application – This is a native application that you download from Google and which is used to pair the Chromecast device with your Wifi network.

Chrome and Chromecast extension – The Chrome web browser with the Chromecast extension installed.

That’s the most basic setup. Once all of those pieces are configured you can “throw” any webpage running in Chrome with the Chromecast extension on to the display with the Chromecast device. Here’s a picture of Dan Catt’s Flambientcam being thrown on to a small 7-inch display on my desk:

chromecast-small-1

Okay! The next two terms of reference aren’t really that complicated, but their names are more conceptual than specific identifiers:

The “Sender” – This is a webpage that you load in Chrome and which can cause a custom web page/application (often called the “receiver”, but more on that below) to be loaded on to one or more the Chromecast device via a shared API.

The “Receiver” – This is also a webpage but more specifically it needs to be a living breathing URL somewhere on the same Internet that is shared by and can be loaded by a Chromecast device. And not just any URL can be loaded either. You need to have the URL in question whitelisted by Google. Once the URL has been approved you will be issued an application ID. That ID needs to be included in a little bit of Javascript in both the “sender” and the “receiver”.

There are a couple important things to keep in mind:

  • First, the “sender” application has super powers. It also needs to run on a machine with a running web browser and, more specifically, that web browser is the one with the super powers since it can send anything to any of the “displays”. So that pretty much means a dedicated machine that sits quietly in a locked room. The “sender” is just a plain vanilla webpage with some magic Google Javascript but that’s it.
  • Second, the “receiver” is a webpage that is being rendered on/by the Chromecast device. When you “throw” a webpage to a Chromecast device (like the picture of Dan’s Flambientcam above) the Chromecast extension is simply beaming the contents of the browser window to the display, by way of the Chromecast device, rather than causing the device to fetch and process data locally.

Since there’s no more way to talk at this webpage (the “sender”) because it’s running in a browser window that means we need a bridging server or a… “broker” which will relay communications between the webpage and other applications. You may be wondering “Wait… talk at the sender” or “Wait… other applications?” or just plain “…What?”

Don’t worry about that. It may seem strange and confusing but that’s because we haven’t told you exactly what we’re trying to do yet!

We’re trying to do something like this:

chromecast-small-3

We’re trying to imagine a system where one dedicated machine running Chrome and the Chromecast extension that is configured to send messages and custom URLs for a variety of museum signage purposes to any number of displays throughout the museum. Additionally we want to allow a variety of standalone “clients” in such a way that they can receive information about what is being displayed on a given display and to send updates.

We want the front-of-house staff to be able to update the signage from anywhere in the museum using nothing more complicated than the web browser on their phone and we want the back-of-house staff to be able to create new content (sic) for those displays with nothing more complicated than a webpage.

That means we have a couple more names of things to keep track of:

The Broker – This is a simple socket.io server – a simple to use and elegant server that allows you do real-time communications between two or more parties – that both the “sender” and all the “clients” connect to. It is what allows the two to communicate with each other. It might be running on the same machine as a the Chrome browser or not. The socket.io server needn’t even be in the museum itself. Depending on how your network and your network security is configured you could even run this server offsite.

The Client – This is a super simple webpage that contains not much more than some Javascript code to connect to a “broker” and ask it for the list of available displays and available “screens” (things which can shown on a display) and controls for setting or updating a given display.

In the end you have a model where:

  • Some things are definitely in the museum (displays, Chromecast devices, the browser that loads the sender)
  • Some things are probably in the museum (the client applications used to update the displays (via the broker and the sender))
  • Some things that might be in the museum (the sender and receiver webpages themselves, the broker)

At least that’s the idea. We have a working prototype and are still trying to understand where the stress points are in the relationship between all the pieces. It’s true that we could just configure the “receiver” to connect to the “broker” and relay messages and screen content that way but then we need to enforce all the logic behind what can and can’t be shown, and by whom, in to the receiver itself. Which introduces extra complexity that become problematic to update easily across multiple displays and harder still to debug.

chromecast-leather-sm

We prefer to keep the “sender” and “receiver” as simple as possible. The receiver is little more than an iframe which can load a URL and a footer which can display status messages and other updates. The sender itself is little more than a relay mechanism between the broker and the receiver.

All of the application logic to control the screens lives in the “broker” which is itself a node.js server. Right now the list of stuff (URLs) that can be sent to a display is hard-coded in the server code itself but eventually we will teach it to talk to the API exposed by the content management system that we’ll use to generate museum signage. Hopefully this enforces a nice clean separation of concerns and will make both develop and maintenance easier over time.

chromecast-horn

We’ve put all of this code up on our GitHub account and we encourage to try and it out and let us know where and when it doesn’t work and to contribute your fixes. (For example, careful readers will note the poor formatting of timestamps in some of the screenshots above…) — thanks to hugovk this particular bug has already been fixed! The code is available at:

https://github.com/cooperhewitt/chromecast-signage

This is a problem that all museums share and so we are hopeful that this can be the first step in developing a lightweight and cost-effective infrastructure to deploy dynamic museum signage.

This is what a simple "client" application running on a phone might look like.

This is what a simple “client” application running on a phone might look like. In this example we’ve just sent a webpage containing the schedule for nearby subway stations to a “device” named Maui Pinwale.

We haven’t built a tool that is ready to use “out of the box” yet. It probably still has some bugs and possibly even some faulty assumptions (in its architecture) but we think it’s an approach that is worth pursuing and so, in closing, it bears repeating that:

We want the front-of-house staff to be able to update the signage from anywhere in the museum using nothing more complicated than the web browser on their phone and we want the back-of-house staff to be able to create new content (sic) for those displays with nothing more complicated than a webpage.