Monthly Archives: December 2014

emacs Cheat Sheet

Due to a frequent need to work off of different servers, I found it necessary to graduate from nano and up my command line text editor skills. Enter emacs! Aaron gave me a quick crash course, from which I generated a cheat sheet of everyday commands to tape to my monitor. Rule #1 of emacs (for me at least) was “forget every keyboard shortcut you’ve ever known,” so having a cheat sheet to remind me that “copy” is “escape key, w key” was necessary until my muscle memory kicked in.

If you’re in this situation maybe this cheat sheet will help you too.

Gist is here.

EMACS CHEAT SHEET

C-g . . . . . . . Stop bothering me
C-x C-c . . . . . Exit Emacs

C-x C-f . . . . . Find File
C-x k . . . . . . Kill Buffer
C-x b . . . . . . Load Buffer
C-x o . . . . . . Next Buffer
C-x left/right  . Next/Previous buffer
C-x [0-3] . . . . Fiddle with buffer views

M-g g . . . . . . Goto Line
C-a . . . . . . . Beginning of line
C-e . . . . . . . End of line
C-v . . . . . . . Page down
M-v . . . . . . . Page up
C-s . . . . . . . Search in buffer
C-x C-s . . . . . Save buffer

C-space . . . . . Set mark
C-w . . . . . . . Cut
M-w . . . . . . . Copy
C-y . . . . . . . Paste

M-x things:
M-x shell . . . . . . Open Shell
M-p . . . . . . . . . Previous shell command
M-x replace-string  . Find/Replace in file
M-x rgrep . . . . . . Find in folders
M-x list-packages . . Package Manager

Magit:
s . . . . Stage
u . . . . Unstage
c . . . . Commit
k . . . . Discard modification
P . . . . Push
F . . . . Pull
C-c C-c . Save commit message

Dired Mode:
m . . . Mark file
u . . . Unmark file
! . . . Perform shell command on file(s)

Our new ticketing website

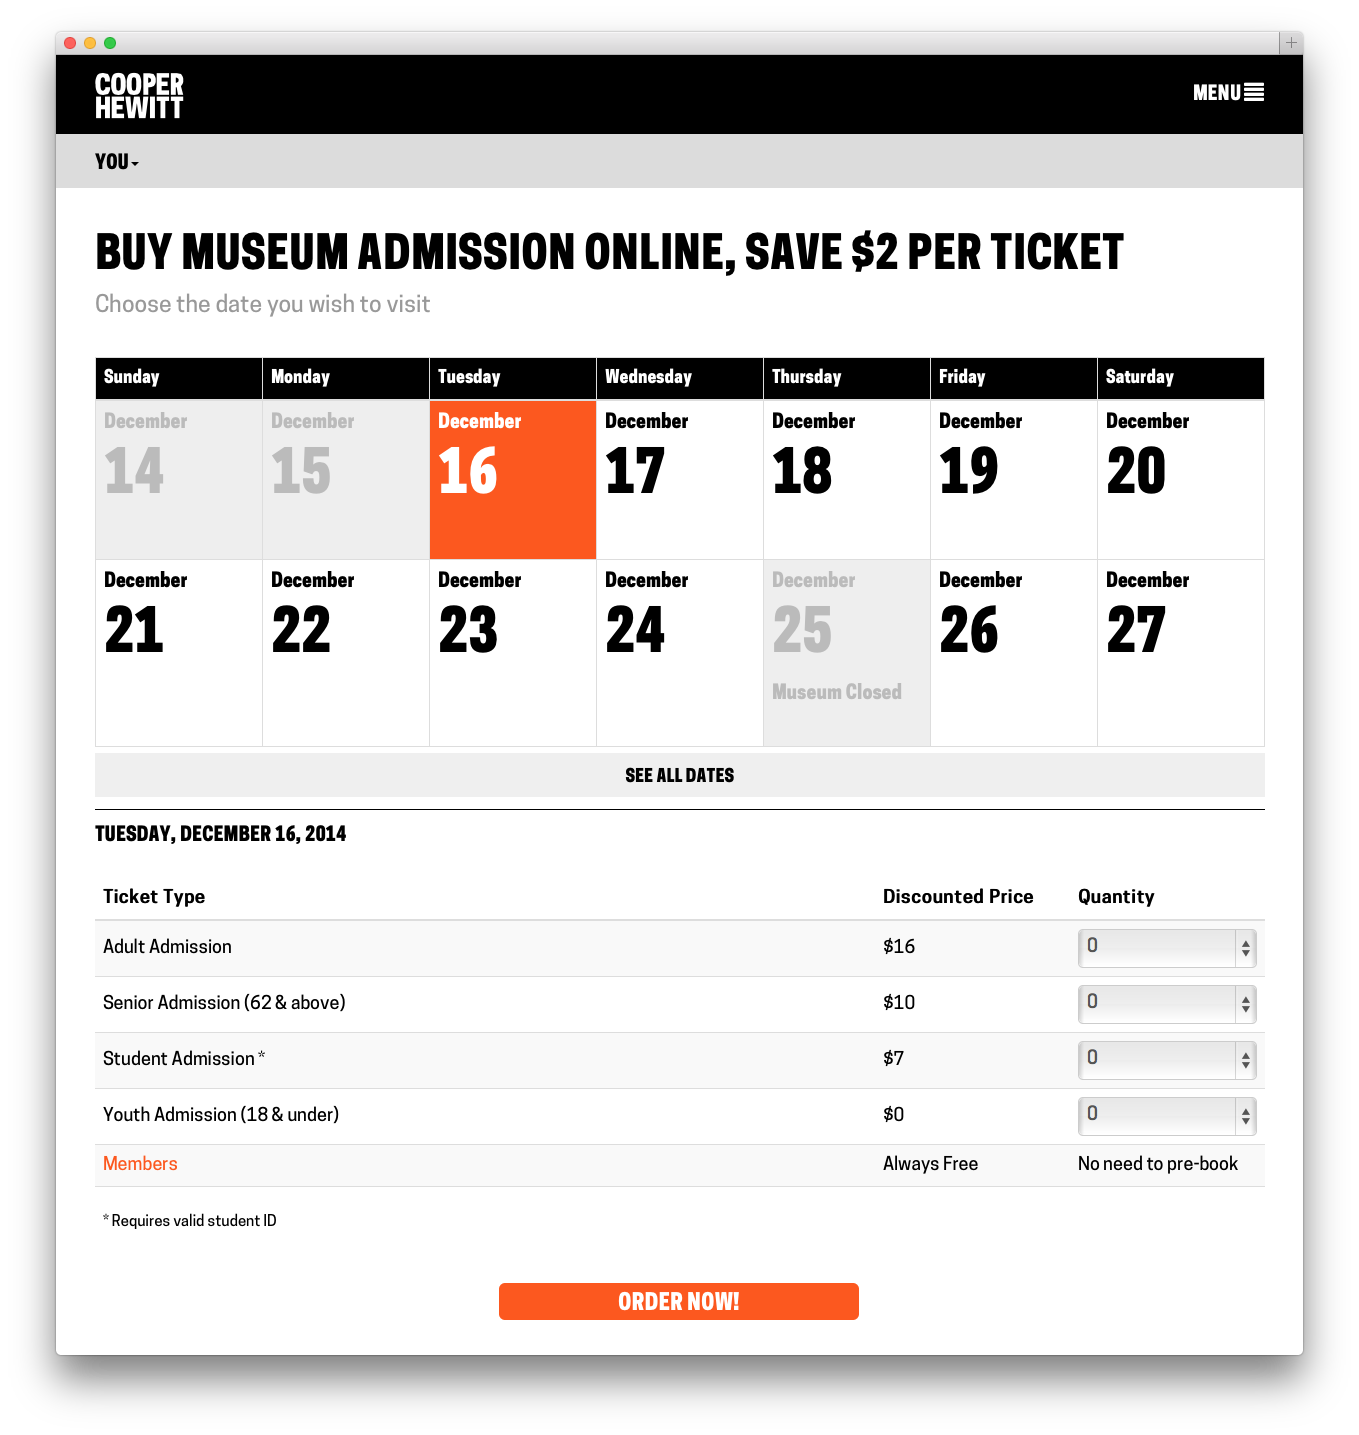
Screenshot 2014-12-16 16.25.03

This past week we launched https://tickets.cooperhewitt.org — a new online ticketing system which leverages our Consitutent Relationship Management application, Tessitura, as its “source of truth.”

It’s a simple application, really. It lets you pick the day you want to come visit us, select the kind of tickets you want to buy, and then you fill out your basic info, plug in your credit card digits and off you go. Moments later you receive an email with PDF versions of your tickets attached.

On the user-facing side of things, it is designed to be as simple as possible. You don’t need to log in, there is no “shopping cart”, and above all, you can do all of this from your phone if you want to skip ahead of the lines this Winter on your first visit back since we closed nearly three years ago.

A little background

The idea to pre-book tickets online came at us from a number of directions. Some time last year we decided to invest in Tessitura to handle all of our CRM needs. Tessitura, if you have never heard of it before, is an enterprise class, battleship that grew out of the Met Opera House and has made its way around the performing arts sector. It’s a great tool if you are looking to centralize everything there is to know about a Constituent. As a museum, it is also appealing in that it does many of the things that non-profit type cultural institutions need to do out of the box.

So, Tessitura. It is now a thing at our museum. Everyone on our staff started ramping up on the software and getting settled into the idea of using Tessitura for one thing or another. Our department began to get requests.

Obviously our membership department would like to use Tessitura to sell and manage memberships. Development would like to use it to manage and collect donations and gifts. Education would like to centralize all public programs, book tours, manage special events, and all of the other crazy things they do. And did I mention we have a museum that sells tickets?

This is how it always starts. The avalanche of ideas, whiteboard sessions, product demos and gentle emails that say things like “When will Tessitura be ready?” begin to pour in. You have to soak it all in and then wring it all out.

The Simplest, Dumbest Thing

Aaron says that quite often. “Just do the simplest, dumbest thing…” and he’s right. Often times you have to boil things down a bit to get to the real core issues at hand. It was clear from the start that this would be an essential part of the “design process” on this project.

So, I started out by asking myself this question:  “What is the most basic thing we want to do with Tessitura?”

I wound up with two clear answers.

  1. We wanted to be able to sell tickets online. Just basic, general admission tickets. Nothing fancy yet.
  2. We eventually want to use Tessitura as our identity provider, and as a way to pair your ticket with the Pen. More on that towards the end…

Tackling Tickets

So to get started, I thought about the challenge of selling a ticket online. I looked at other sites I liked such as StubHub, EventBrite, and other venue websites that I knew used Tessitura like BAM, Jazz at Lincoln Center, and the 92Y. I did some research, I bought some tickets, and I asked all my friends who used these sites what they liked and disliked. Eventually I started to find my way gravitating towards the Eventbrite way of doing things. We have been using Eventbrite for a couple of years here at Cooper Hewitt, for the most part as a way to sell tickets to education programs and events.

To tell you the truth, Eventbrite has been a dream come true for us and our sales for these events, both paid and free, have been very good. So, what is Eventbrite doing right? Simply put they’ve made the process of purchasing a ticket to an event online stupidly simple.

I wanted to know more. So, I spent some time and slowly walked myself through the process of booking all kinds of things on Eventbrite. I tried to step through each page in the process, I tried to notice what kind of user feedback I got, and what sort of emails and notifications I got. I tried the same on mobile devices and through their iPhone app. Here are a few takeaways.

  1. You don’t need to register in order to purchase a ticket on Eventbrite.
  2. If you don’t register when making an initial purchase, you can register later and see your purchase history.
  3. As soon as you book your tickets, you get them in an email.
  4. The Thank You page is just as useful when you are logged out as when you are logged in.
  5. Most importantly, you can only buy one thing at a time. In other words, there is no idea of a Shopping Cart.

That last one was pretty huge. Most eCommerce sites are built around the idea that users put items in a cart and then “Checkout.” Eventbrite doesn’t do it this way. Instead, you simply pick the thing you are wanting to attend, select the kinds of tickets you want ( student, senior, etc ) and then put in your credit card info. Once you hit submit, you’ve paid for your tickets and your transaction is complete.

I felt this flow was incredibly powerful and probably one of the reasons Eventbrite was working so well for our education programs. There are simply less chances to change your mind, less confusion over what you are buying, and the end-to-end process of picking something out and paying for it is just so much smaller than the more traditional shopping cart experience.

I began to think of it kind of like the difference between getting your weekly groceries and just picking up a six pack. The behaviors are totally different because you are trying to accomplish two totally different tasks. One is very routine, requires a little creativity and some patience, and a willingness to wander around and “pick.” The other is a strategic strike, designed to get in and get out so you can get home and relax with a nice cold one.

The Eventbrite concept seemed like what we wanted. I had my simplest dumbest thing, and something to model it on.

Technical Challenges

With every new project comes some kind of technical challenge(s). Tessitura is a “new to us” application and our staff at Cooper Hewitt were clearly at the bottom left of a steep learning curve when we started the project. We also had many challenges we knew we were going to have to face because we are a “Governmental Institution.” So things like PCI compliance, complex network configurations, and security scans were all things I was going to need to learn about.

Tessitura comes with two APIs. One is a somewhat older ( as in the first thing they built ) SOAP API, and the other is a newer ( as in still under development ) REST API. Both allow data to get in and out of Tessitura in a variety of forms.

In addition to the standard SOAP and REST APIs, Tessitura has the facility to expose just about anything you can build into an MS SQL Stored Procedure through its API. This is an incredibly powerful feature, which can also be quite dangerous if you think about it.

When I attended the Tessitura Learning Conference & Convention this past summer, it became clear to me that many institutions that use Tessitura are building some kind of API wrapper, or some type of middleware that helps them make sense of it all. We chose to do the same. To accomplish this, I chose to model the API wrapper off our own Collections API, which is a REST-ish API based on Flamework, and uses oAuth2 for authentication. Having this API wrapper allows us to all speak the same language and use the same interface. It is also very, very similar to the Collections API, so among our own staff, it is pretty easy to navigate. The API wrapper, wraps methods from both the Tessitura SOAP and the REST APIs and presents a unified interface to both of them. It doesn’t implement every single API method, and it exposes “new” methods that we have custom built via those Stored Procedures I mentioned.

The Tickets website is a separate project that talks directly to the API. It is also a Flamework project, written primarily in PHP. It uses a MySQL database to store a small amount of local data, but for the most part it is making calls to the API wrapper, which in turn is making calls to either the SOAP or REST Tessitura APIs. Tessitura is the source of truth for most of the things the Ticketing website does.

The Front End
Screenshot 2014-12-16 16.25.44

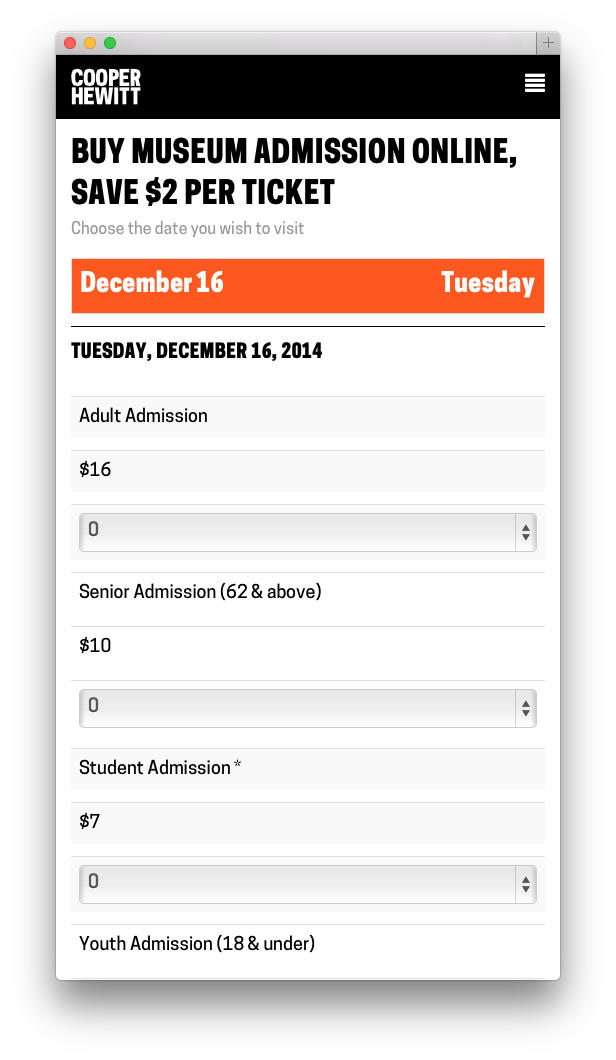
The Tickets site from the user’s perspective is designed to be extremely simple. I worked with Sam ( our in house front end guru ) to build a responsive, and simple web application that does basically one thing, but the devil is always in the details.

At first glance, all the site does is allow you to select the day you want to come visit us, pick out what kinds of tickets you want, and then fill out your billing info and receive your tickets. It’s basically a calendar and a form and not much more. But like I said, the devil is in the details.

First, Sam built a beautiful calendar like one I’d never seen before. We talked at length about how dumb most website calendars were, and we tried to push things in a new direction. Our calendar starts out by showing you what you most likely are looking for–Today. It displays the next bunch of days up to two weeks worth by default, and if you are looking for a special date, it lets you drop down and navigate around until you find it. On mobile its slightly different in that it doesn’t show you any past dates ( why would you want to book the past? ) and it limits things a little so you’re not as overwhelmed by the interface. We call this “designing for context” and we thought that users might be using their mobile phones to buy a ticket online and jump up to the front of the queue.

Once you’ve selected the date you want, the app loads up the available tickets right below the calendar. You can easily change your mind and pick a different date. From here you just select the type and quantity of each ticket you want. Sam’s code does a bunch of front-end validations to make sure everything you are trying to do makes sense ( you can only purchase a youth ticket with another paid ticket for example ). Between the two of us, we try to do as much validation to what you are selecting as possible, both in Javascript on the front-end and in PHP on the back.

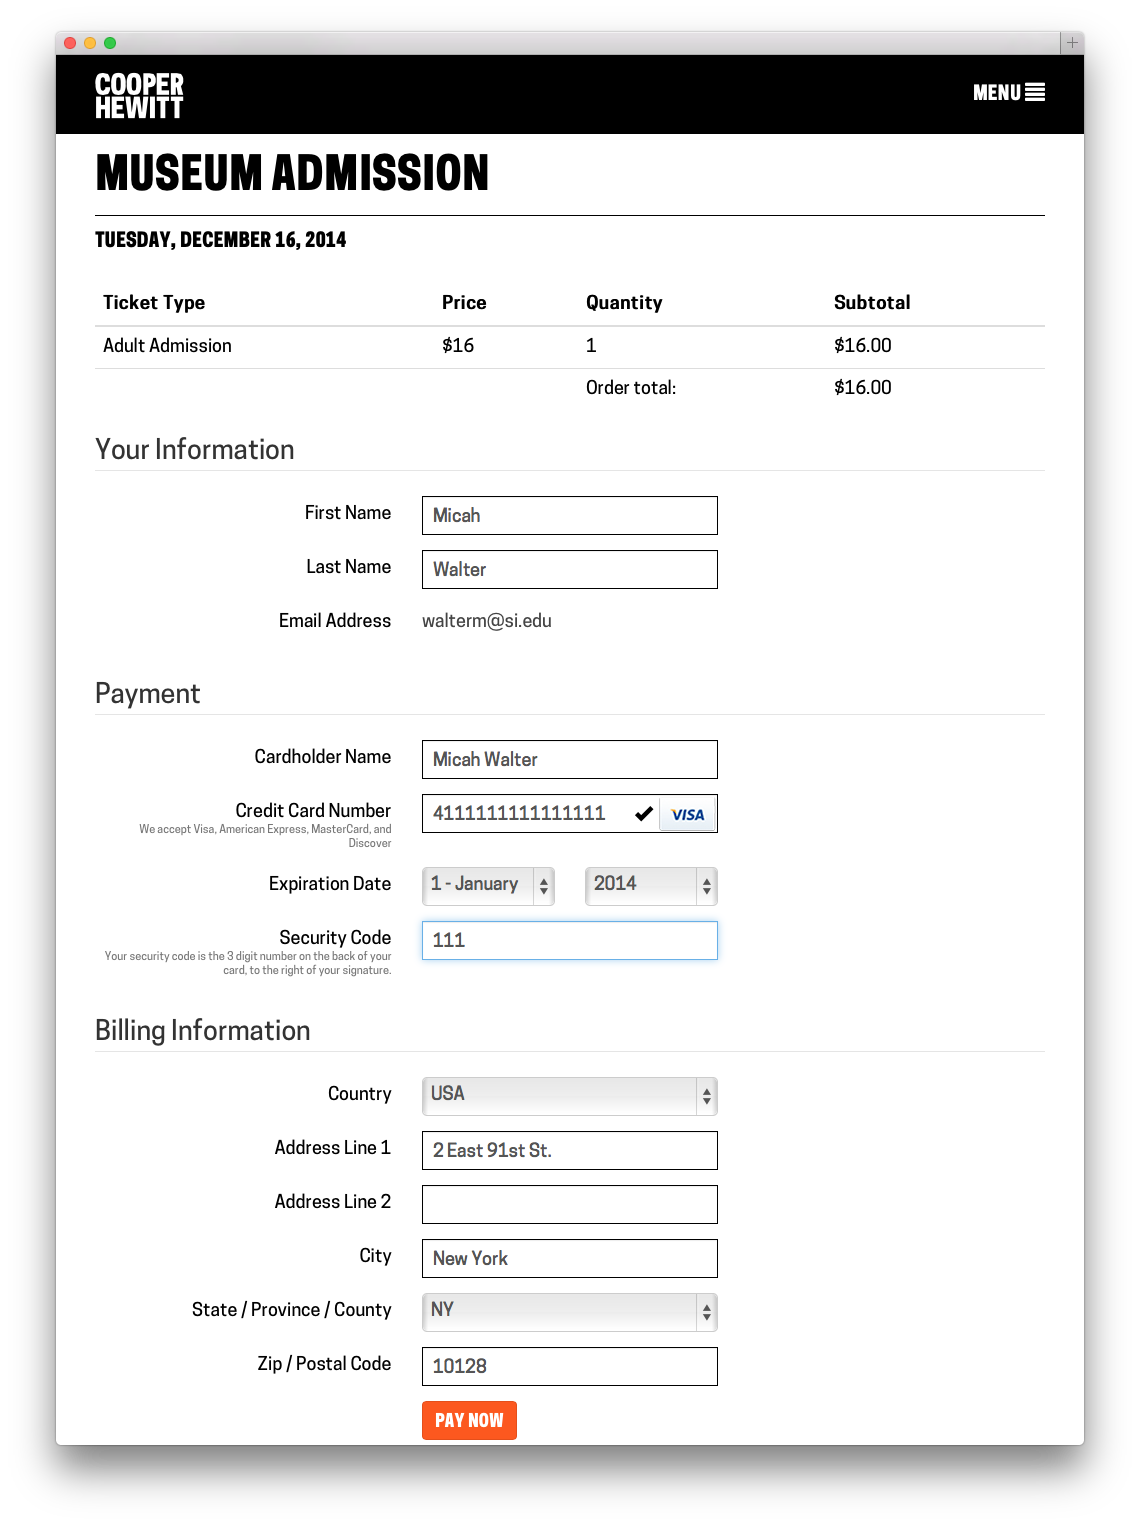
Once you hit Order Now, an order form is generated and displayed. I think its important to note here that nothing has really happened yet in Tessitura-land. We asked Tessitura for some details about the tickets you are interested in, but we haven’t “added them to your cart” or anything like that as of yet.
Screenshot 2014-12-16 16.28.34

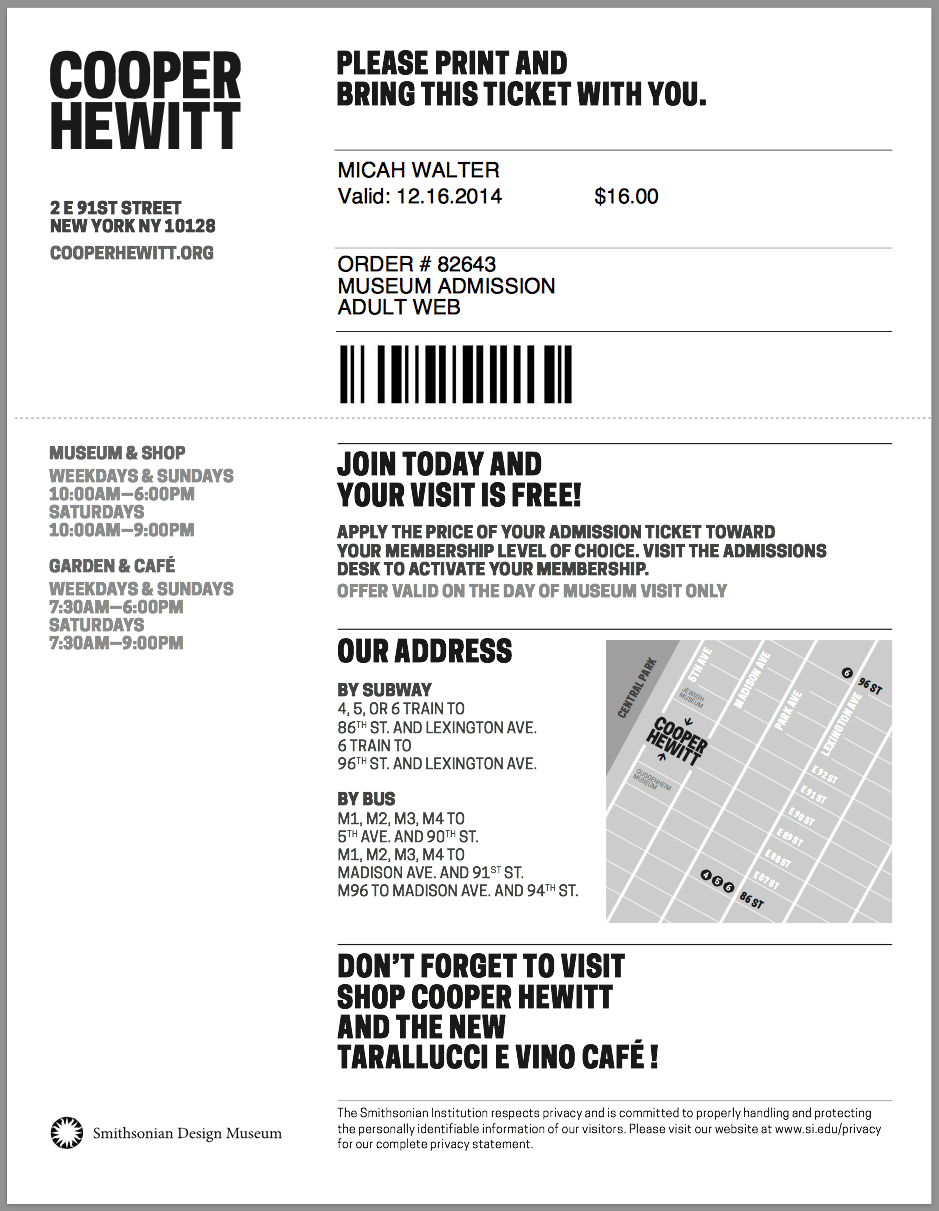
You can then fill out your vitals. We ask you to give us your name, email, credit card details and billing address. We store all of this, with the exception of your credit card, in Tessitura. We make you an account, and at this point we send you an activation email which allows you to set up your password at your leisure. If all goes well with your credit card, we build your tickets ( I chose to do all this with FPDF rather than try and use Tessitura’s built in Print at Home server thing ) send them in an email, and then take you to a Thank You Page. You never had to register, or log in, and you technically never do. Your PDF tickets arrive in your inbox and that is technically all you need.
Screenshot 2014-12-16 16.27.35

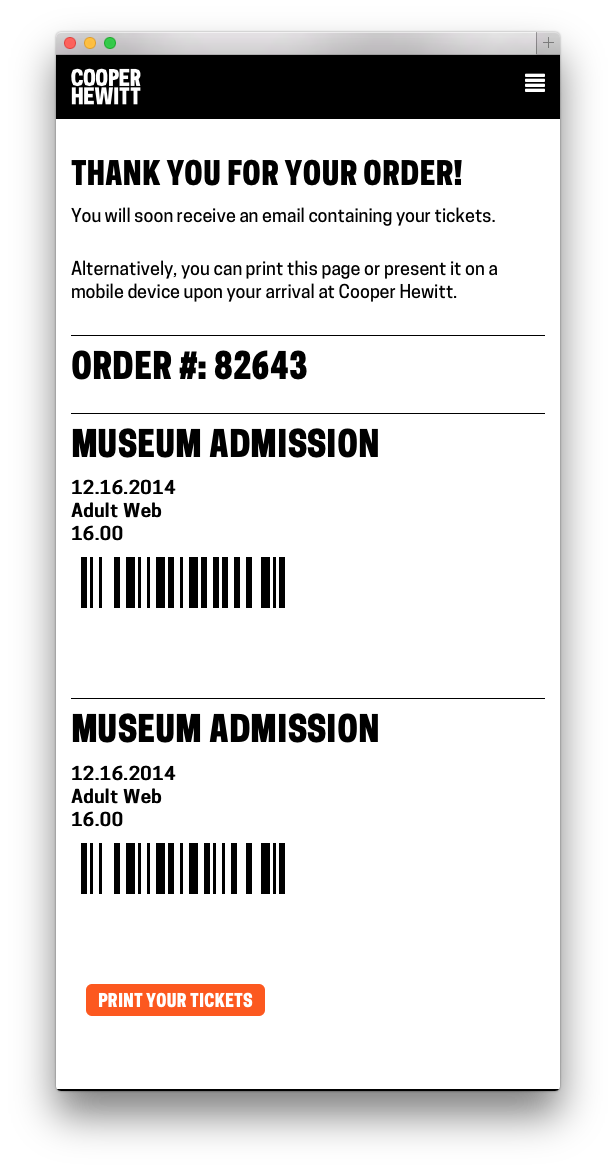
As a little bonus, we just stick the barcode and some basic metadata about each ticket you bought on the Thank You Page so you can just present your phone at the door. This part is still a little rough and I chose to leave it that way for the time being so we can do some user research in the galleries. It’s a nice feature, but only time will tell if people actually use it or if it needs some finesse.
Screenshot 2014-12-16 16.26.50

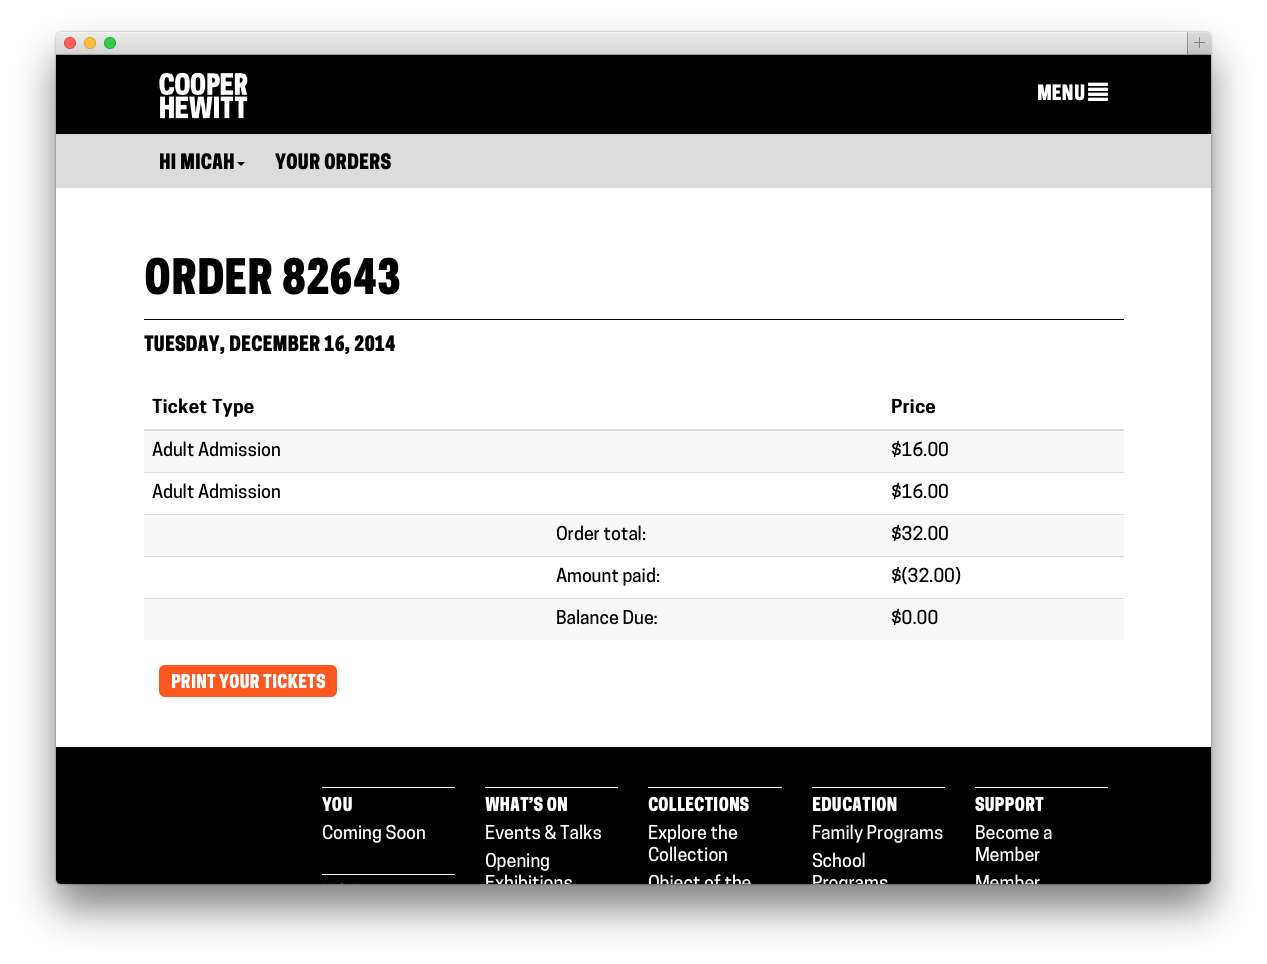
Now that you are in the system, you can buy more tickets using the same email address and they will be connected to your same account, even if you still have never logged in. If you do choose to activate your account and login, you can look at your order history, and reprint your tickets if you’ve lost your email copy.
Screenshot 2014-12-16 16.27.10

Tessitura & The Pen

A while back in this blog post, I mentioned that we also wanted to use Tessitura as our identity provider and as a way to pair the ticket you’ve purchased with the pen we’ve handed you. This work is nearly done, but not yet in production. It will go live when our pen is available sometime in early 2015. But, the short story is, when you buy a ticket, either online or in person, we generate a special coded version of your ticket. This code gets paired up with the internal ID of the pen we gave you and that pairing gets stored in a database. What this all amounts to is that when you get home, and you want to see all the cool things you’ve done with your pen, you simply enter the code ( or go to a custom short URL ) on our website. We look up your pairing and are able to connect your Identity ( Tessitura ) with your Visit ( on the Collections site ). But that is all the topic of a future series of blog posts.

Next

Now that the Tickets site is up and running, and we are watching the sales roll in, it’s easy to start thinking of more features and new ways to expand what the site can do. I’ve already started building simple admin tools and have been thinking about building a basic check-in app for off-site events. It’s too early to talk about all of the things we aim to do and how we plan to expand our online sales, but I’m hopeful that we will stay focused and narrow in our approach, offering our users the most elegant visitor experience possible. Or at the very least, the simplest, dumbest thing.

API methods (new and old) to reflect reality

design-eagle-cloud

A quick end-of-week blog post to mention that now that the museum has re-opened we have updated the cooperhewitt.galleries.openingHours and cooperhewitt.galleries.isOpen API methods to reflect… well, reality.

In addition to the cooperhewitt.galleries API methods we’ve also published corresponding openingHours and isOpen methods for the cafe!

For example, cooperhewitt.galleries.isOpen.

curl 'https://api.collection.cooperhewitt.org/rest/?method=cooperhewitt.galleries.isOpen&access_token=***'

{
	"open": 0,
	"holiday": 0,
	"hours": {
		"open": "10:00",
		"close": "18:00"
	},
	"time": "18:01",
	"timezone": "America/New_York",
	"stat": "ok"
}

Or, cooperhewitt.cafe.openingHours.

curl -X GET 'https://api.collection.cooperhewitt.org/rest/?method=cooperhewitt.cafe.openingHours&access_token=***'

{
	"hours": {
		"Sunday": {
			"open": "07:30",
			"close": "18:00"
		},
		"Monday": {
			"open": "07:30",
			"close": "18:00"
		},
		"Tuesday": {
			"open": "07:30",
			"close": "18:00"
		},
		"Wednesday": {
			"open": "07:30",
			"close": "18:00"
		},
		"Thursday": {
			"open": "07:30",
			"close": "18:00"
		},
		"Friday": {
			"open": "07:30",
			"close": "18:00"
		},
		"Saturday": {
			"open": "07:30",
			"close": "21:00"
		}
	},
	"timezone": "America/New_York",
	"stat": "ok"
}

Because coffee, right?

Sharing our videos, forever

This is one in a series of Labs blogposts exploring the inhouse built technologies and tools that enable everything you see in our galleries.

Our galleries and Pen experience are driven by the idea that everything a visitor can see or do in the museum itself should be accessible later on.

Part of getting the collections site and API (which drives all the interfaces in the galleries designed by Local Projects) ready for reopening has involved the gathering and, in some cases, generation of data to display with our exhibits and on our new interactive tables. In the coming weeks, I’ll be playing blogger catch-up and will write about these new features. Today, I’ll start with videos.

jazz hands

Besides the dozens videos produced in-house by Katie – such as the amazing Design Dictionary series – we have other videos relating to people, objects and exhibitions in the museum. Currently, these are all streamed on our YouTube channel. While this made hosting much easier, it meant that videos were not easily related to the rest of our collection and therefore much harder to find. In the past, there were also many videos that we simply didn’t have the rights to show after their related exhibition had ended, and all the research and work that went into producing the video was lost to anyone who missed it in the gallery. A large part of this effort was ensuring that we have the rights to keep these videos public, and so we are immensely grateful to Matthew Kennedy, who handles all our image rights, for doing that hard work.

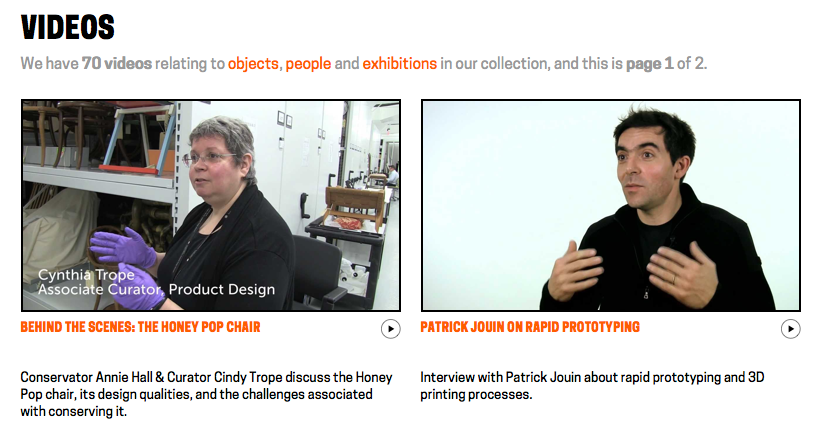
A few months ago, we began the process of adding videos and their metadata in to our collections website and API. As a result, when you take a look at our page for Tokujin Yoshioka’s Honey-Pop chair , below the object metadata, you can see its related video in which our curators and conservators discuss its unique qualities. Similarly, when you visit our page for our former director, the late Bill Moggridge, you can see two videos featuring him, which in turn link to their own exhibitions and objects. Or, if you’d prefer, you can just see all of our videos here.

In addition to its inclusion in the website, video data is also now available over our API. When calling an API method for an object, person or exhibition from our collection, paths to the various video sizes, formats and subtitle files are returned. Here’s an example response for one of Bill’s two videos:

{
  "id": "68764297",
  "youtube_url": "www.youtube.com/watch?v=DAHHSS_WgfI",
  "title": "Bill Moggridge on Interaction Design",
  "description": "Bill Moggridge, industrial designer and co-founder of IDEO, talks about the advent of interaction design.",
  "formats": {
    "mp4": {
      "1080": "https://s3.amazonaws.com/videos.collection.cooperhewitt.org/DIGVID0059_1080.mp4",
      "1080_subtitled": "https://s3.amazonaws.com/videos.collection.cooperhewitt.org/DIGVID0059_1080_s.mp4",
      "720": "https://s3.amazonaws.com/videos.collection.cooperhewitt.org/DIGVID0059_720.mp4",
      "720_subtitled": "https://s3.amazonaws.com/videos.collection.cooperhewitt.org/DIGVID0059_720_s.mp4"
    }
  },
  "srt": "https://s3.amazonaws.com/videos.collection.cooperhewitt.org/DIGVID0059.srt"
}

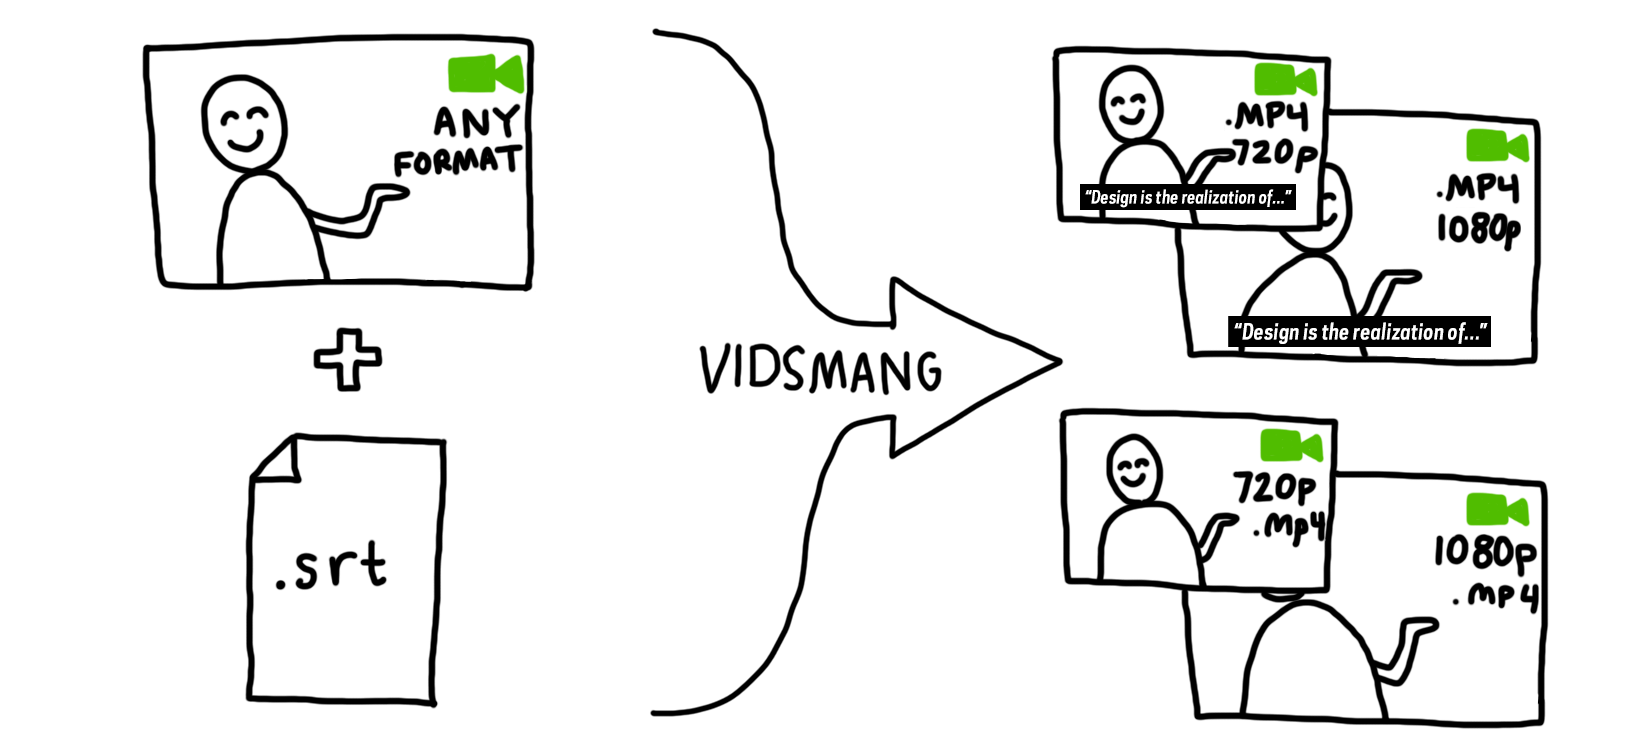
The first step in accomplishing this was to process the videos into all the formats we would need. To facilitate this task, I built VidSmanger, which processes source videos of multiple sizes and formats into consistent, predictable derivative versions. At its core, VidSmanger is a wrapper around ffmpeg, an open-source multimedia encoding program. As its input, VidSmanger takes a folder of source videos and, optionally, a folder of SRT subtitle files. It outputs various sizes (currently 1280×720 and 1920×1080), various formats (currently only mp4, though any ffmpeg-supported codec will work), and will bake-in subtitles for in-gallery display. It gives all of these derivative versions predictable names that we will use when constructing the API response.

a flowchart showing two icons passing through an arrow that says "vidsmang" and resulting in four icons

Because VidSmanger is a shell script composed mostly of simple command line commands, it is easily augmented. We hope to add animated gif generation for our thumbnail images and automatic S3 uploading into the process soon. Here’s a proof-of-concept gif generated over the command line using these instructions. We could easily add the appropriate commands into VidSmanger so these get made for every video.

anim

For now, VidSmanger is open-source and available on our GitHub page! To use it, first clone the repo and the run:

./bin/init.sh

This will initialize the folder structure and install any dependencies (homebrew and ffmpeg). Then add all your videos to the source-to-encode folder and run:

./bin/encode.sh

Now you’re smanging!

HTTP ponies

Most of the image processing for the collections website is done using the Python programming language. This includes things like: extracting colours or calculating an image’s entropy (its “busy-ness”) or generating those small halftone versions of image that you might see while you wait for a larger image to load.

Soon we hope to start doing some more sophisticated computer vision related work which will almost certainly mean using the OpenCV tool chain. This likely means that we’ll continue to use Python because it has easy to use and easy to install bindings to hide most of the fiddly bits required to look at images with “robot eyes”.

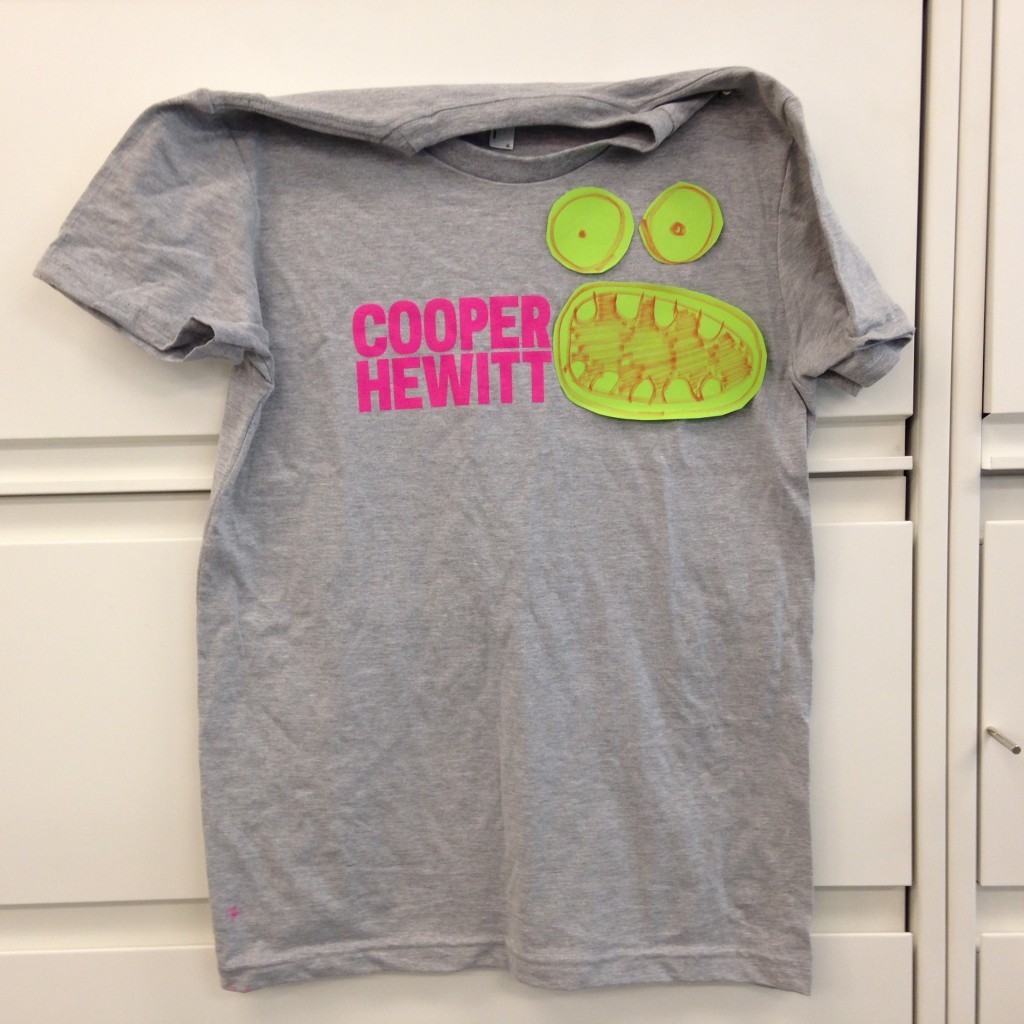
shirt

The collections website itself is not written in Python and that’s okay. There are lots of ways for different languages to hold hands inside of a single “application” and we’ve used many of them. But we also think that most of these little pieces of functionality are useful in and of themselves and shouldn’t require that a person (including us) have to burden themselves with the minutiae of the collections website infrastructure to use them.

We’ve slowly been taking the various bits of code we’ve written over the years and putting them in to discrete libraries that can then be wrapped up in little standalone HTTP “pony” or “plumbing” servers. This idea of exposing bespoke pieces of functionality via a web server is hardly new. Dave Winer has been talking about “fractional horsepower HTTP servers” since 1997. What’s changed between then and now is that it’s more fun to say “HTTP pony” and it’s much easier to bake a little web server in to an application because HTTP has become the lingua franca of the internet and that means almost every programming language in use today knows how to “speak” it.

In practice we end up with a “stack” of individual pieces that looks something like this:

  1. Other people’s code that usually does all the heavy-lifting. An example of this might be Giv Parvaneh’s RoyGBiv library for extracting colours from images or Mike Migurski’s Atkinson library for dithering images.
  2. A variety of cooperhewitt.* libraries to hide the details of other people’s code.
  3. The cooperhewitt.flask.http_pony library which exports a setup of helper utilities for the running Flask-based HTTP servers. Things like: doing a minimum amount of sanity checking for uploads and filenames or handling (common) server configuration details.
  4. A variety of plumbing-SOMETHING-server HTTP servers which export functionality via HTTP GET and POST requests. For example: plumbing-atkinson-server, plumbing-palette-server and so on.
  5. Flask, a self-described “micro-framework” which is what handles all the details of the HTTP call and response life cycle.
  6. Optionally, a WSGI-compiliant server-container-thing-y for managing requests to a number Flask instances. Personally we like gunicorn but there are many to choose from.

Here is a not-really-but-treat-it-like-pseudo-code-anyway example without any error handling for the sake of brevity of a so-called “plumbing” server:

# Let's pretend this file is called 'example-server.py'.

import flask
from flask_cors import cross_origin
import cooperhewitt.example.code as code
import cooperhewitt.flask.http_pony as http_pony

app = http_pony.setup_flask_app('EXAMPLE_SERVER')

@app.route('/', methods=['GET', 'POST'])
@cross_origin(methods=['GET', 'POST'])
def do_something():

    if flask.request.method=='POST':
       path = http_pony.get_upload_path(app)
    else:
       path = http_pony.get_local_path(app)

    rsp = code.do_something(path)
    return flask.jsonify(rsp)

if __name__ == '__main__':
    http_pony.run_from_cli(app)

So then if we just wanted to let Flask take care of handling HTTP requests we would start the server like this:

$> python example-server.py -c example-server.cfg

And then we might talk to it like this:

$> curl -X POST -F 'file=@/path/to/file' https://localhost:5000

Or from the programming language of our choosing:

function example_do_something($path){
        $url = "https://localhost:5000";
        $file = curl_file_create($path);
        $body = array('file' => $file);
        $rsp = http_post($url, $body);
        return $rsp;
}

Notice the way that all the requests are being sent to localhost? We don’t expose any of these servers to the public internet or even between different machines on the same network. But we like having the flexibility to do that if necessary.

Finally if we just need to do something natively or want to write a simple command-line tool we can ignore all the HTTP stuff and do this:

$> python
>>> import cooperhewitt.example.code as code
>>> code.do_something("/path/to/file")

Which is a nice separation of concerns. It doesn’t mean that programs write themselves but they probably shouldn’t anyway.

If you think about things in terms of bricks and mortar you start to notice that there is a bad habit in (software) engineering culture of trying to standardize the latter or to treat it as if, with enough care and forethought, it might achieve sentience.

That’s a thing we try to guard against. Bricks, in all their uniformity, are awesome but the point of a brick is to enable a multiplicity of outcomes so we prefer to leave those details, and the work they entail, to people rather than software libraries.

face-tower

Most of this code has been open-sourced and hiding in plain sight for a while now but since we’re writing a blog post about it all, here is a list of related tools and libraries. These all fall into categories 2, 3 or 4 in the list above.

  • cooperhewitt.flask — Utility functions for writing Flask-based HTTP applications. The most important thing to remember about things in this class is that they are utility functions. They simply wrap some of the boilerplate tasks required to set up a Flask application but you will still need to take care of all the details.

Everything has a standard Python setup.py for installing all the required bits (and more importantly dependencies) in all the right places. Hopefully this will make it easier for us break out little bits of awesomeness as free agents and share them with the world. The proof, as always, will be in the doing.

face-mirror

We’ve also released go-ucd which is a set of libraries and tools written in Go for working with Unicode data. Or more specifically, for the time being since they are not general purpose Unicode tools, looking up the corresponding ASCII name for a Unicode character.

For example:

$> ucd 䍕
NET; WEB; NETWORK, NET FOR CATCHING RABBIT

Or:

$> ucd THIS → WAY
LATIN CAPITAL LETTER T
LATIN CAPITAL LETTER H
LATIN CAPITAL LETTER I
LATIN CAPITAL LETTER S
SPACE
RIGHTWARDS ARROW
SPACE
LATIN CAPITAL LETTER W
LATIN CAPITAL LETTER A
LATIN CAPITAL LETTER Y

There is, of course, a handy “pony” server (called ucd-server) for asking these questions over HTTP:

$> curl -X GET -s 'https://localhost:8080/?text=♕%20HAT' | python -mjson.tool
{
    "Chars": [
        {
            "Char": "u2655",
            "Hex": "2655",
            "Name": "WHITE CHESS QUEEN"
        },
        {
            "Char": " ",
            "Hex": "0020",
            "Name": "SPACE"
        },
        {
            "Char": "H",
            "Hex": "0048",
            "Name": "LATIN CAPITAL LETTER H"
        },
        {
            "Char": "A",
            "Hex": "0041",
            "Name": "LATIN CAPITAL LETTER A"
        },
        {
            "Char": "T",
            "Hex": "0054",
            "Name": "LATIN CAPITAL LETTER T"
        }
    ]
}

This one, potentially, has a very real and practical use-case but it’s not something we’re quite ready to talk about yet. In the meantime, it’s a fun and hopefully useful tool so we thought we’d share it with you.

Note: There are equivalent libraries and an HTTP pony for ucd written in Python but they are incomplete compared to the Go version and may eventually be deprecated altogether.

Comments, suggestions and gentle clue-bats are welcome and encouraged. Enjoy!

face-stand