Category Archives: Backends

Welcome to object phone. Your call has been placed in a queue.

I made another small thing. Again, another way for me to experiment with the Collection API, and again, another way to experiment with new ways of accessing the collection. This time, there aren’t many screen shots to display–there is no website to look at. This time, it’s “Welcome to object phone!”

(718) 213-4915

Object Phone” is ( presently ) a very, very simple implementation of a way to explore our collection by dialing a telephone, or sending a text message. I had been thinking of a few of the more popular museum oriented audio tour products, and how they all seem to be very CMS style in their design, and wondering if we could just use our own API.

For example, TourML and TAP ( which offer the web programmer a very powerful framework for programming a mobile guide using the Drupal CMS ) are very nice, but they are still very dependent on content production. The developer or content manager has to build and curate all of the content for the “tour.” This might be a good way to go about things, especially if you are leaning on an existing Drupal installation for a good deal of your content, but I was looking for a way to access existing data, and specifically the data in our collection website.

In the beginning of developing our collection website, we went through the process of assigning EVERYTHING a unique “bigint” in the form of what we are referring to as an “artisinal integer.” This means that each object record, each person record and each, well, everything else has a unique integer which no other thing can have. This is not in place of accession numbers–we will probably always have accession numbers The nice thing about unique integers is that they’re really easy to deal with on a programmatic level.

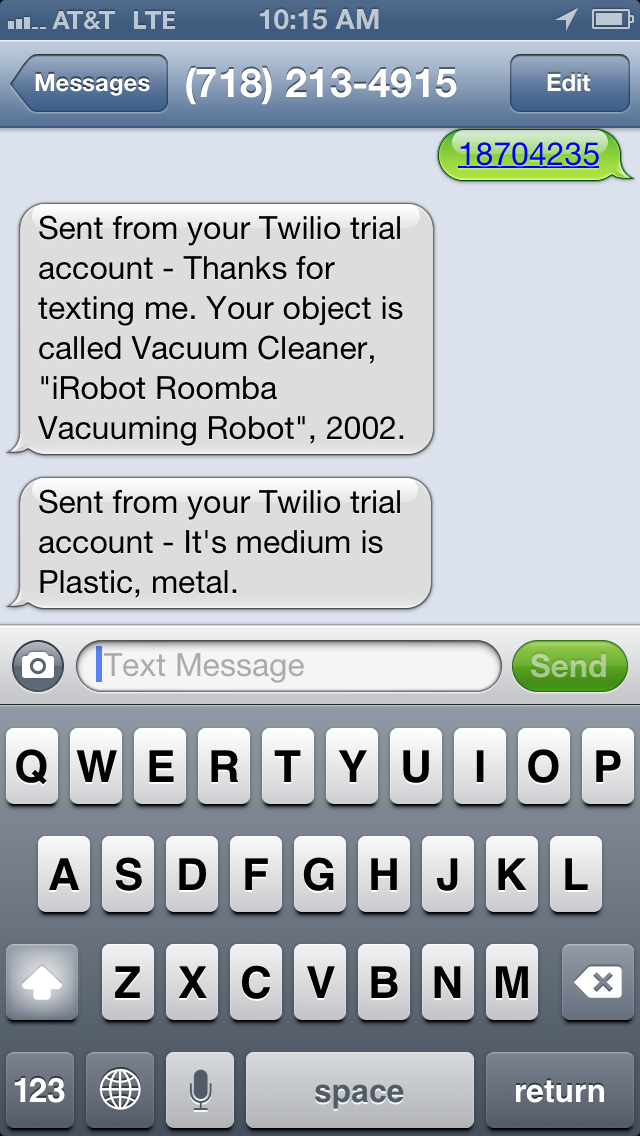
For example, if you text 18704235 to 718-213-4915 you should get a response that looks like the screenshot below. In fact you can text any object id number from our collection and get a similar response.

2013-04-18 10.15.18

You can also dial that same number and use your keypad to either search the collection by object ID, or ask for a random object. The application will respond to you using a text to speech converter, which is usually pretty good.

Presently, the app is not replying with a whole lot of information. You essentially get the object’s title and medium field if it has one. In many cases, asking for a random object may just result in something like “Drawing.” Many of our object records don’t have much more useful information than this, and also, I am trying to wrangle with the idea of how much information is useful in a voice and text message ( with a 160 character limit per SMS).

The whole system is leveraging the Twilio service and API. Twilio offers quite a range of possibilities, and I am very excited to experiment with more. For example, instead of text to speech, Twilio can play back .wav files. Additionally, Twilio can do things like dial another phone number, forward calls and record the caller’s voice. There are so many possibilities here that I wont even begin to list them, but for example, I could easily see us using this to capture user feedback in our galleries by phone and text.

I’m very interested in figuring out a way to search by voice. I’m sort of dreaming of programming the thing to go “Why don’t you just tell me the object number!” as in this great episode of Seinfeld which you can watch by clicking the image below.

Screen Shot 2013-04-18 at 10.35.01 AMIf you are interested, I have also made the code public on this Gist. It’s pretty messy and redundant right now, but you’ll get the idea.

One of the more complicated aspects of this project will be designing the phone interface so it makes sense. Currently, once you hear an object play back, the system just hangs up on you. It would be nice to offer the user a better way to manipulate the system which is still pleasant and easy to understand. By that same token, there is a completely different approach that is needed for the SMS end of things as you don’t really have a menu tree, but instead of list of possible commands the user need to learn. Fortunately, there is a ton of great work that has already been accomplished in this arena, specifically by the Walker Art Center’s very long running and very yellow website Art on Call.

Source code at github.com/cooperhewitt/objectphone

Totally cached out

We do a good deal of cacheing on our web properties here at Cooper-Hewitt.

Our web host, PHPFog adds a layer of cacheing for free known as Varnish cache. Varnish Cache sits in front of our web servers and performs what is known as reverse proxy cacheing. This type of cacheing is incredibly important as it adds the ability to quickly serve cached files to users on the Internet vs. continually recreating dynamic web-pages by making calls into the database.

For static assets such as images, javascripts, and css files, we turn to Amazon’s CloudFront CDN. This type of technology ( which I’ve mentioned in a number of other posts here ) places these static assets on a distributed network of “edge” locations around the world, allowing quicker access to these assets geographically speaking, and as well, it removes a good deal of burden from our application servers.

However, to go a bit further, we thought of utilizing memcache. Memcache is an in-memory database key-value type cacheing application. It helps to speed up calls to the database by storing as much of that information in memory as possible. This has been proven to be extremely effective across many gigantic, database intensive websites like Facebook, Twitter, Tumblr, and Pinterest ( to name just a few ). Check this interesting post on scaling memcached at Facebook.

To get started with memcache I turned to Amazon’s Elasticache offering. Elasticache is essentially a managed memcache server. It allows you to spin up a memcache cluster in a minute or two, and is super easy to use. In fact, you could easily provision a terabyte of memcache in the same amount of time. There is no installation, configuration or maintenance to worry about. Once your memcache cluster is up and running you can easily add or remove nodes, scaling as your needs change on a nearly real-time basis.

Check this video for a more in-depth explanation.

Elasticache also works very nicely with our servers at PHPFog as they are all built on Amazon EC2, and are in fact in the same data center. To get the whole thing working with our www.cooperhewitt.org blog, I had to do the following.

  1. Create a security group. In order for PHPFog to talk to your own Elasticache cluster, you have to create a security group that contains PHPFog’s AWS ID. There is documentation on the PHPFog website on how to do this for use with an Amazon RDS server, and the same steps apply for Elasticache.
  2. Provision an Elasticache cluster. I chose to start with a single node, m1.large instance which gives me about 7.5 Gig of RAM to work with at $0.36 an hour per node. I can always add more nodes in the future if I want, and I can even roll down to a smaller instance size by simply creating another cluster.
  3. Let things simmer for a minute. It takes a minute or two for your cluster to initialize.
  4. On WordPress install the W3TC plugin. This plugin allows you to connect up your Elasticache server, and as well offers tons of configurable options for use with things like a CloudFront CDN and more. Its a must have! If you are on Drupal or some other CMS. there are similar modules that achieve the same result.
  5. In W3TC enable whatever types of cacheing you wish to do and set the cache type to memcache. In my case, I chose page cache, minify cache, database cache, and object cache, all of which work with memcache. Additionally I set up our CloudFront CDN from within this same plugin.
  6. In each cache types config page, set your memcache endpoint to the one given by your AWS control panel. If you have multiple nodes, you will have to copy and paste them all into each of these spaces. There is a test button you can hit to make sure your installation is communicating with your memcache server.

That last bit is interesting. You can have multiple clusters with multiple nodes serving as cache servers for a number of different purposes. You can also use the same cache cluster for multiple sites, so long as they are all reachable via your security group settings.

Once everything is configured and working you can log out and let the cacheing being. It helps to click through the site to allow the cache to build up, but this will happen automatically if your site gets a decent amount of traffic. In the AWS control panel you can check on your cache cluster in the CloudWatch tab where you can keep track of how much memory and cpu is being utilized at any given time. You can also set up alerts so that if you run out of cache, you get notified so you can easily add some nodes.

We hope to employ this same cacheing cluster on our main cooperhewitt.org website, as well as a number of our other web properties in the near future.

Rebooting retail – redesigning the Shop at Cooper-Hewitt

Jocelyn Crapo is the Cooper-Hewitt’s Director of Retail Operations. She and her team have been working to transfer the focus of the museum shop from its former physical presence in the galleries to an online experience whilst the redevelopment takes place.

To that end, a brand new ecommerce presence went live as public beta last week.

Here’s Jocelyn.

Tell us about the history of Cooper-Hewitt’s online shop.

The Shop’s first ecommerce site launched in June of 2006, using a custom content management system on the back end and was a close visual representation of the physical shop space. The first iteration used Paypal as the payment processor and the shop staff maintained inventory levels for both the physical shop and the Ecommerce site by running online sales through the Point of Sale in the Shop.

At the time we were using and constantly maintaining three different content management systems within the Retail team and as many accounting platforms within one department.

1. CAM Commerce’s Retail Star Point-of-Sale system to maintain inventory levels and Accounting reports,
2. Filemaker to maintain “blurb” information for display in the physical shop space and to maintain online blurb information
3. Custom CMS to maintain the Ecommerce website
4. Paypal to process Ecommerce sales

It was very inefficient and downright clunky. Not to mention a high risk of human error.

If there was a price change on one product, the price had to be changed in four different places, often requiring action from at least three different people. The price had to be updated in Retail Star, a new tag printed and affixed to the product, the price had to be updated in Filemaker and a new blurb had to be printed and displayed within the shop, and finally the Ecommerce CMS had to be updated for the web. All this for a small change of price in one product!

We began looking for a new inventory management system that could handle more of our needs. We wanted a system where the product attributes (price, blurb, inventory) could all be managed by one person in one place as much as possible. We finally identified a system and launched with the new system in October, 2010.

How did the old site perform?

During the first 5 years, our online sales ranged from 5-8% of our gross sales – which may not seem very significant, but given the small investment cost that went into the site in 2006, it paid for itself many times over.

As we were able to gather better and better data from Google Analytics we found that we had a conversion problem. We were getting visitors to the site, but in the end only 0.39% of the total visitors who came to the online shop actually purchased something.

Worse, only 10.81% of the visitors who put something in their cart actually completed the transaction.

While we were frustrated with the back-end functionality we knew that we had to streamline our front-end usability issues and bring up the conversion rates.

As we approached the beginning of a major renovation at the Cooper-Hewitt campus at the end of 2011, it was crucial to move forward as quickly as possible to get the new website on its feet. It quickly became the sole revenue source for the retail business venture and we needed a way to put more products online – quickly and easily. Moving from having both a physical shop and an online shop to having just an online shop has posed some new challenges.

We’ve had to re-evaluate order quantities and think differently about our space constraints. We don’t have the luxury of having two different selling platforms. We no longer have the face-to-face contact on the sales floor that inherently sparks a connection and relationship between the retailer and visitor. We are also challenged to interact visually and via narrative, rather than a tactile, person-to-person selling experience.

What were the features you looked for in a new site?

We needed a new system that offered;

– Real time inventory management for multiple sales channels: POS in physical shop space, Ecommerce site, potential pop-up shops, etc.

One immediate problem we experienced was maintaining inventory levels, especially when we had a product that was picked up for editorial coverage and we had a hard time keeping product in the shop, while fulfilling the website orders. It became obvious very quickly that we needed a much more robust system that could maintain real-time inventory, selling products through the physical shop, through an off-site kiosk or pop-up shop, and on the web with one central inventory.

– Seamless payment.

The old site used Paypal as the payment gateway and we knew from Google Analytics that many visitors to our site who had placed items in their shopping cart were not completing their purchases. By doing some tracking we discovered that nearly 9 out of every 10 were abandoning the purchase when they left us to checkout through Paypal.

– Modern, flexible navigation and search, not to mention SEO.
– Integrated members discounting
– Flexible product pages that would allow us to tell the stories of different products and why we had selected them for our shop.
– Real time Fedex pricing

Let’s look at some before and after screens

Home page before and after. The new site is less cryptic and allows us to show many more products immediately.

Product category view before and after

Product detail before and after. The new site gives the ability to have more detailed information on the products, large pop up views, as well as recommendations in the sidebar.

Checkout before and after. A much more streamlined checkout process without having to go offsite to PayPal.

How do you think the online shop will affect the future retail presence of Cooper-Hewitt?

Looking forward, I imagine we will have a very different perspective as we plan to open the next iteration of The Shop at Cooper-Hewitt when the museum re-opens.

What were once major factors in product selection will likely become less important, for example, our audience won’t necessarily be limited to people who can physically come to the Upper East Side, and we’ll undoubtedly have an off-site storage facility that will allow us to offer larger footprint products like furniture, lighting, textiles, even wallpapers.

We will also be able to use web analytics to inform merchandising strategies as we re-open a brick and mortar shop down the line, for instance, we can start to drill down into the purchasing habits of our customers, i.e. people who bought “x” also bought “y”. Armed with this knowledge we might merchandise two products together, that we wouldn’t have ever dreamed of displaying together before.

In fact, we will have the tools to do some online experiments which will provide quick and measurable results about what products sell best when merchandised together. These types of statistics were impossible to gather within our physical space since we had no way to track real time results of merchandising changes.

It will be very interesting, now that we have this new ecommerce system in place, whether the new identity of the physical shop will respond to the website or if the website will morph to a brand new graphic expression in response to the design of the new Shop to open with the new museum buildings.

When does the new site launch?

It is in public beta right now! And we’re doing a formal launch in May after we make some incremental improvements to it over the next two months.

Check it out!

Upending ticketing

One of the opportunities we have right now is to challenge the conventional wisdom that back-of-house systems need to always be ‘enterprise grade’. As we are currently in renovation mode and our exhibitions and programs are happening offsite and around the city, we have the chance to rethink and experiment with different systems to perform common functions such as ticketing. In so doing we are looking at the way different systems shape visitor/staff interactions and are also able to refocus by choosing systems on their user experience rather than their ‘backwards compatibility’.

A recent change we’ve made is to use EventBrite for ticketing, replacing a system that despite being tightly integrated with our donor management system placed an inscrutable purchasing interface between the customer and their desired tickets. It isn’t a permanent solution (what is these days?), but more the opening of a ‘possibility space’.

So how is it going?

Our ticket selling velocity has increased – events sell more quickly – and we’ve been able to integrate ticket selling directly into our email marketing, as well. When ticket price points have reached capacity we’ve used automatic waitlisting and we’ve even been able to collect donations as purchasers buy tickets, and we’ve also been able to issue refunds easily when required. Most importantly the customer experience of purchasing tickets has vastly improved.

Last night, we had our first trial of a medium size event check-in. Using the EventBrite iPhone Check-In App we were able to run a cashless door using staff members’ iPhones to check everyone in quickly. Checkins were done via ticket scans and where people had forgotten their printed ticket, by name. Each iPhone synced to the master list meaning that we could easily ‘add extra ticket staff’ to process more people if we had a logjam. This had a nice side effect of freeing up staff time to direct visitors to our roving iPads for quick signup to our mailing list on their way into the venue.

But the purpose of deploying lightweight technologies as a replacement for gargantuan enterprise systems is not just about improving visitor experience, or streamlining back-of-house operations – it is also about positioning us to reconceptualise the type of entry/ticketing experience we might want for our new building and galleries when they are completed.

If it is possible to do the entry experience to events in a seamless mannner with only mobile devices, can a museum jettison its ticket counter in a redesign? It also makes us ask ourselves to be specific about the other functions ticket counters might serve.

Media servers and some open sourceness

We use Amazon S3 for a good portion of our media hosting. It’s a simple and cost effective solution for serving up assets big and small. When we moved initially to Drupal 6.x ( about a year ago ) I wanted to be sure that we would use S3 for as many of our assets as possible. This tactic was partly inspired by wanting to keep the Drupal codebase nice and clean, and also to allow us to scale horizontally if needed ( multiple app servers behind a load balancer ).

Horizontal Scaling

Horizontal Scaling

So in an attempt to streamline workflows, we modified this amazon_s3 Drupal module a little. The idea was to allow authors to easily use the Drupal node editor to upload their images and PDFs directly to our S3 bucket. It would also rewrite the URLs to pull the content from our CloudFront CDN. It also sorts your images into folders based on the date ( a-la-Wordpress).

amazon_s3

Our fork of amazon_s3 rewrite the URL for our CDN, and sorts into folders by date.

I’ve opened sourced that code now which is simply a fork of the amazon_s3 module. It works pretty well on Drupal 6.x. It has an issue where it uploads assets with some incorrect meta-data. It’s really only a problem for uploaded PDFs where the files will download but won’t open in your browser. This has to do with the S3 metadata tag of application/octet-stream vs. application/pdf. All in all I think its a pretty useful module.

As we move towards migrating to Drupal 7, I have been doing some more research about serving assets via S3 and CloudFront. Additionally, it seems that the Drupal community have developed some new modules which should help streamline a few things

Custom Origin

Create a CloudFront distribution for you whole site using a custom origin

As of a couple years ago Amazon’s CloudFront CDN allows you to use a custom origin. This is really great as you can simply tell it to pull from your own domain rather than an S3 bucket.

So for example, I set this blog up with a CloudFront distribution that pulls direct from https://www.cooperhewitt.org. The resultant distribution is at https://d2y3kexd1yg34t.cloudfront.net. If you go to that URL you should see a mirror of this site. Then all we have to do is install a plugin for WordPress to replace static asset URLs with the CloudFront URL. You might notice this in action if you inspect the URL of any images on the site. You can of course add a CNAME to make the CloudFront URL prettier, but it isn’t required.

On the Drupal end of things, there is a simple module called CDN that does the same thing as we are doing here via the WordPress W3TC plugin. It simply replaces static asset files with your CloudFront domain. Additionally, I see there is now a new Drupal module called amazons3 ( note the lack of the underscore ). This module is designed to allow Drupal to replace it’s default file system with your S3 bucket. So, when a user uploads files through the Drupal admin interface ( which normally sends files to sites/default/files on your local server ) files automatically wind up in your S3 bucket.

I haven’t gotten this to work as of yet, but I think it’s a promising approach. Using this setup, you could maintain a clean and scalable Drupal codebase, keeping all of your user uploaded assets on an S3 bucket without much change to the standard workflow within the Drupal backend. NICE!


Moving to the Fog

When people have asked me where we host our website, I have usually replied with “it’s complicated.”

Last week we made some serious changes to our web infrastructure. Up until now we have been running most of our web properties on servers we have managed ourselves at Rackspace. These have included dedicated physical servers as well as a few cloud based instances. We also have a couple of instances running on Amazon EC2, as well as a few properties running at the Smithsonian Mothership in Washington DC.

For a long time, I had been looking for a more seamless and easier to manage solution. This was partially achieved when I moved the main site from our old dedicated server to a cloud-based set of instances behind a Rackspace load balancer. It seemed to perform pretty well, but still I was mostly responsible for it on my own.

PHPFog

PHPFog can be used to easily scale your web-app by adding multiple app servers

Eventually I discovered a service built on top of Amazon EC2 known as PHPFog. This Platform as a Service (PaaS) is designed to allow people like myself to easily develop and deploy PHP based web apps in the Cloud. Essentially, what PHPFog does is set up an EC2 instance, configured and optimized by their own design. This is placed behind their own set of load balancers, Varnish Cache servers and other goodies, and connected up with an Amazon RDS MySQL server. They also give you a hosted Git repository, and in fact, Git becomes your only connection to the file system. At first this seemed very un-orthrodox. No SSH, no FTP, nothing… just Git and PHPMyAdmin to deal with the database. However, I spent a good deal of time experimenting with PHPFog and after a while I found the workflow to be really simple and easy to manage. Deployment is as easy as doing a Git Push, and the whole thing worked in a similar fashion to Heroku.com, the popular Ruby on Rails PaaS.

What’s more is that PHPFog, being built on EC2 was fairly extensible. If I wanted to, I could easily add an ElastiCache server, or my own dedicated RDS server. Basically, through setting up security groups which allow communication to PHPFog’s instances, I am able to connect to just about anything that Amazon AWS has to offer.

I continued to experiment with PHPFog and found some additional highlights. Each paid account comes with a free NewRelic monitoring account. NewRelic is really great as it offers a much more comprehensive monitoring system than many of the typical server alerting and monitoring apps available today. You can really get a nice picture of where the different bottlenecks are happening on your app, and what the real “end user” experience is like. In short, NewRelic was the icing on the cake.

NewRelic

Our NewRelic Dashboard

So, last week, we made the switch and are now running our main cooperhewitt.org site on “The Fog.” We have also been running this blog on the same instance. In fact, if you are really interested, you can check out our NewRelic stats for the last three hours in the “Performance menu tab!” It took a little tweaking to get our NewRelic alerts properly configured, but they seem to be working pretty seamlessly now.

Here’s a nice video explaining how AppFog/PHPFog works.

As you can see, we’ve got a nice little stack running here and all easily managed with minimal staff resource.

And here’s a somewhat different Fog altogether.

(Yes we are a little John Carpenter obsessed here)